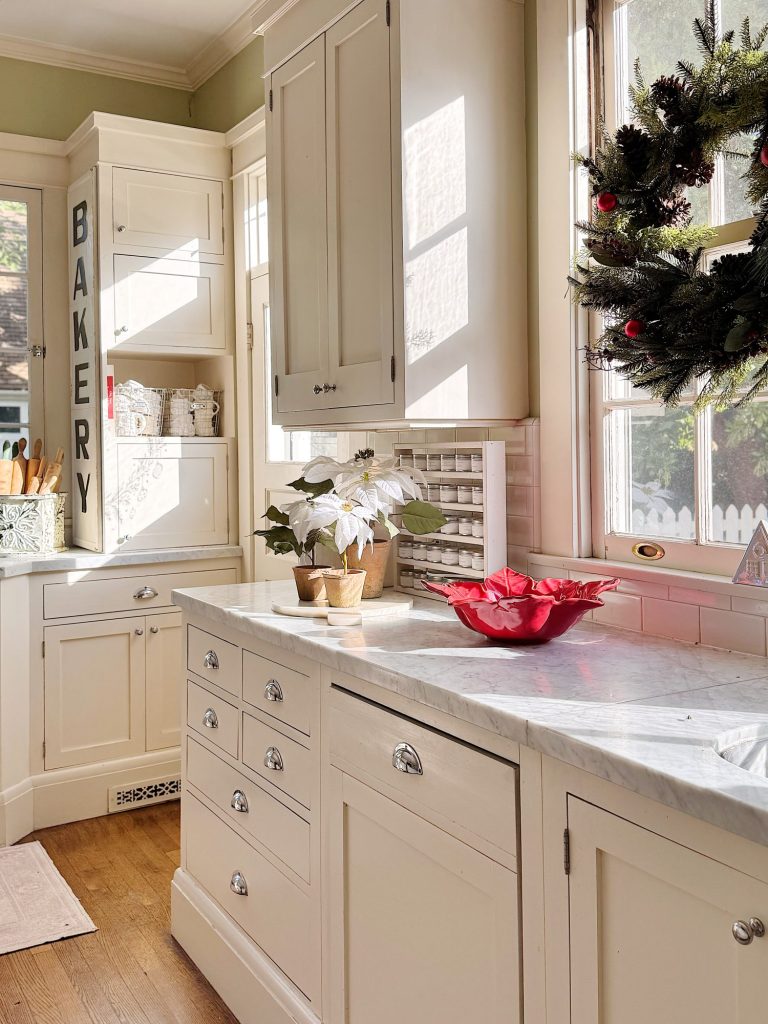
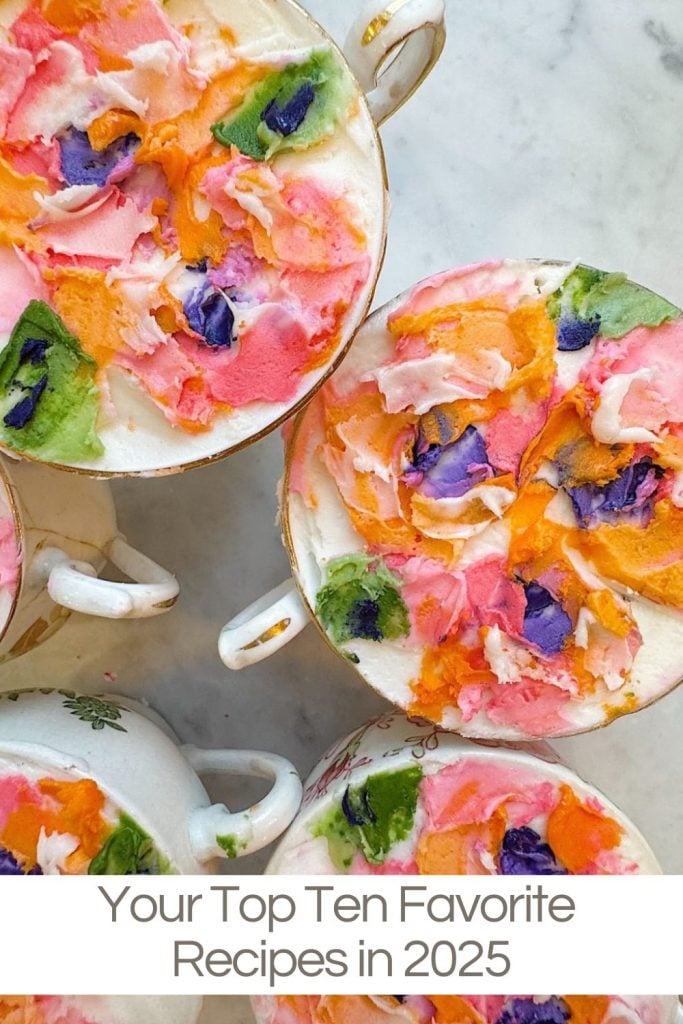
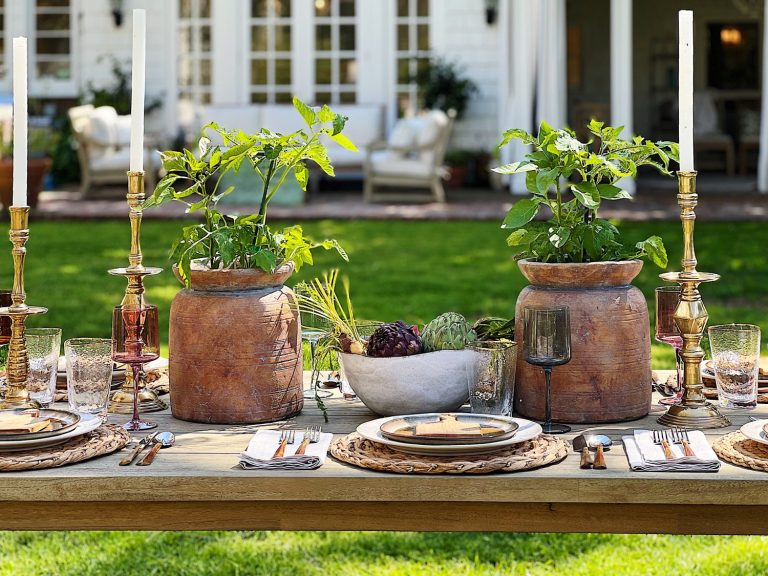
Your Top Ten Favorite Recipes in 2025
Today, I’m sharing my Top Ten Recipes for 2025, a mix of beloved classics, new favorites, and a few surprises I can’t wait for you to try.
These are the recipes I’ve made again and again, the ones my friends text me for, the ones my boys request when they’re home, and the ones I know will show up on my party menus all year long.


As I look back at 2025, I can’t help but smile thinking about all the cooking that happened in my kitchen this year. You all know how much I love to entertain, and honestly, hosting so many gatherings almost forces me, in the very best way, to stay creative, try new techniques, and keep discovering recipes that delight the people I love.
Cooking has never been just about the food for me. It’s about the memories made around the table, the conversations that linger long after dessert, and the joy of feeding people well.
And truly, nothing inspires me more than preparing dishes I know will make someone close their eyes and say, “Oh my gosh… this is incredible!”
From cozy comfort dishes to bright, fresh flavors and a few show-stopping desserts, these ten recipes represent everything I love about cooking: creativity, simplicity, taste, and a touch of fun.
Some came from late-night kitchen experiments, others were inspired by travel, and a few are updated takes on nostalgic family favorites.
Here’s to a year filled with good food, big gatherings, and trying something new in your kitchen. I’m so excited to share these recipes with you, in no particular order, and even more excited to hear which ones become your favorites.
Let’s make this our most delicious year yet!
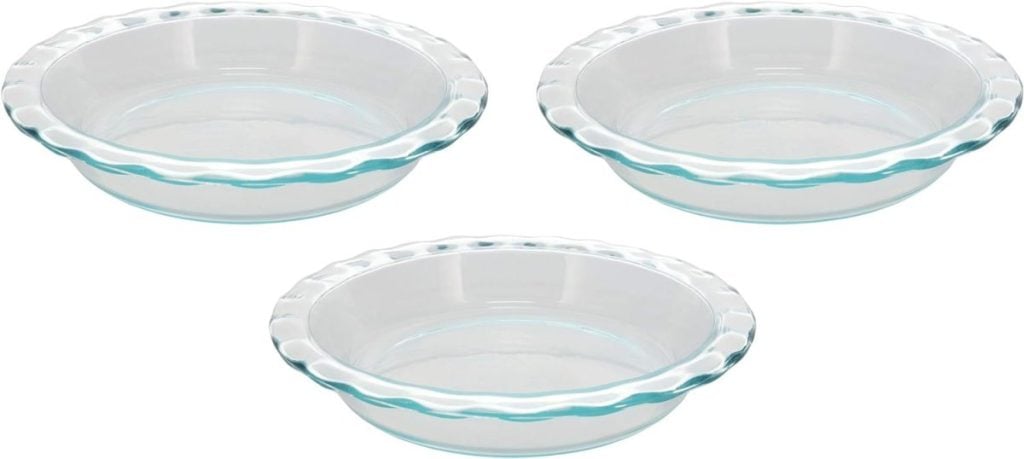
Meyer Lemon Cream Pie
Meyer Lemon Cream Pie with a Twist shares a luscious, easy-to-follow recipe for a creamy, sweet yet tart pie with a graham cracker crust, whipped lemony cream topping, and candied Meyer lemon peel for garnish.
Meyer Lemon Cream Pie
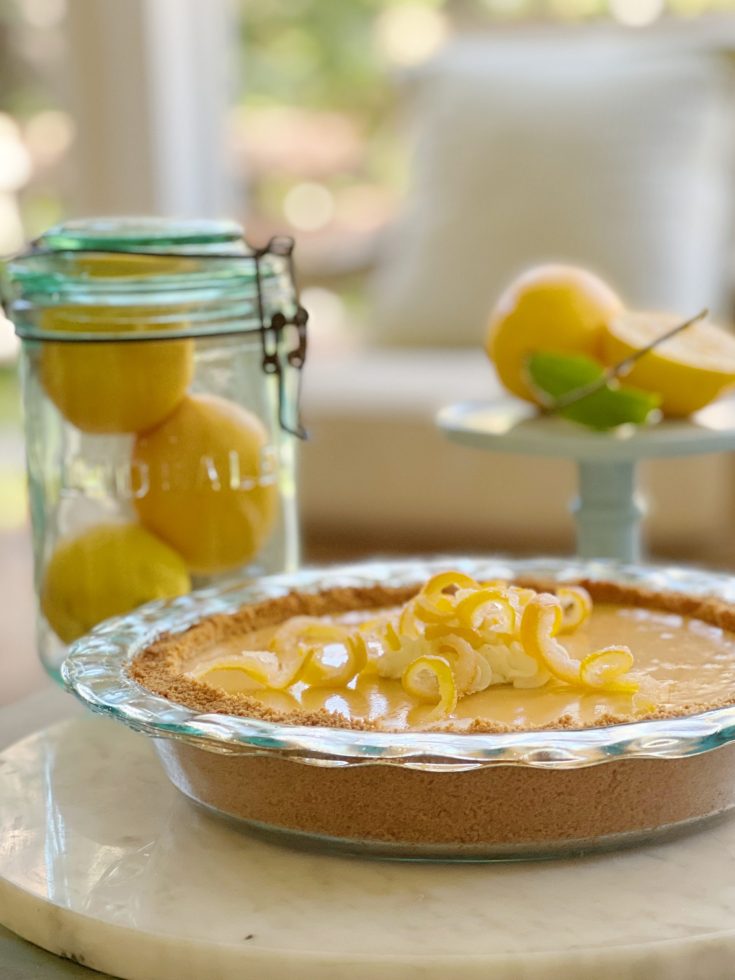
This Meyer lemon pie is the perfect amount of sweet and tart with a yummy graham cracker crust. IT has a lemony whipped cream and candied lemon peel garnish. Bookmark this recipe, it is a crowd-pleaser!
Ingredients
- Crust:
- 2 Cups of Graham Cracker Crumbs
- 1/2 Cup Brown Sugar
- 6 TBL Melted Butter
- Filling:
- 1 Cup Meyer Lemon Juice
- 2 14 oz cans Sweetened Condensed Milk
- 3 Egg Yolks
- 1/4 Tsp salt
- Whipped Topping (for decoration)
- 1/2 Cup Heavy Whipping Cream
- 4 TBL Whipped Cream Cheese
- 2-1/2 TBL Powdered Sugar
- 1 Tsp Meyer Lemon Juice
- Candied Meyer Lemon Peels
- 1 Meyer Lemon
- 1 Cup Water
- 1/4 Cup Sugar
- Another 1/2 Cup of Sugar to spinkle on peels for crystalization
Instructions
Once the pie is made and baked, it needs to refrigerate overnight, so make sure you allow the proper amount of time.
Preheat oven to 350 degrees.
Crust:
1. Combine graham cracker crumbs, brown sugar and melted butter together. Mix well until completed combined.
2. Spray pie pan with nonstick cooking spray.
3. Add crust mixture to the pie pan, pressing into the pan and up the sides of the pan.
4. Bake crust for 8 minutes.
While the crust is baking, make your filling:
1. Add lemon juice, both cans of sweetened condensed milk, egg yolks and salt to bowl, mix together until well combined.
2. Once the crust is out of the oven, fill the crust with the filling mixture. Fill all the way to the top, the filling will not expand or overflow while cooking.
3. Bake filled crust for 17 minutes, until small bubbles begin to form in the filling. When there are about 20 bubbles on the top of the pie, it is done.
4. Once the pie is baked, let cool for at least 30 minutes before refrigerating.
5. Refrigerate the pie for at least one hour, overnight if possible.
Whipped Topping:
Combine heavy whipping cream, whipped cream cheese, powdered sugar and lemon juice. I like to use an immersion blender to make whipped topping, you can use an hand mixer also. Beat until the topping is thick enough to pipe into a design.
Candied Meyer Lemon Peels:
1. Wash the lemon.
2. Cut off the ends of the lemon
3. Cut lemon in half and remove seeds
4. Slice the rind of the lemon half and cut away the pulp so that you are left with a long piece of lemon rind.
5. Roll the rind into a tight pinweel and cut thin slices of the rind (about a 1/4" wide). Hold the pinwheel tightly while slicing.
5. Combine the water and 1/4 cup of sugar in a small saucepan. Heat until sugar is dissolved and has created a simple syrup (don't boil to avoid scorching).
6. Add the thin slices of lemon rind to the simple syrup and cook over low heat for about 30-40 minutes until peels have absorbed most of the syrup.
7. Carefully remove the peels from the syrup with a slotted spoon and place on parchment paper to drain. They will be goopy from the syrup.
8. Once the peels have cooled enough to handle, twist them around a dowel or straw to create the twists. (I used the dowels from my pasta drying rack)
9. Spinkle with the additional sugar to coat the peels.
10. These will keep in airtight container for about a week.
Once the pie has been refrigerated for at least an hour, ideally, overnight, pipe the whipped cream onto the top of the pie in any design you like. You can also serve the whipped cream topping on the side if you prefer. If you serve the whipped cream on the side, I recommend doubling the recipe, it's that good!
Add the candied lemon peels on top of the whipped cream or if you are serving the whipped cream on the side, simply pop the peels onto the top of the pie as a garnish.
Keep pie refrigerated when not serving.
The post captures why this has become a favorite anytime dessert, offering both bright citrus flavor and comforting creaminess that feels like a cross between cheesecake and pie — perfect for spring or summer gatherings.
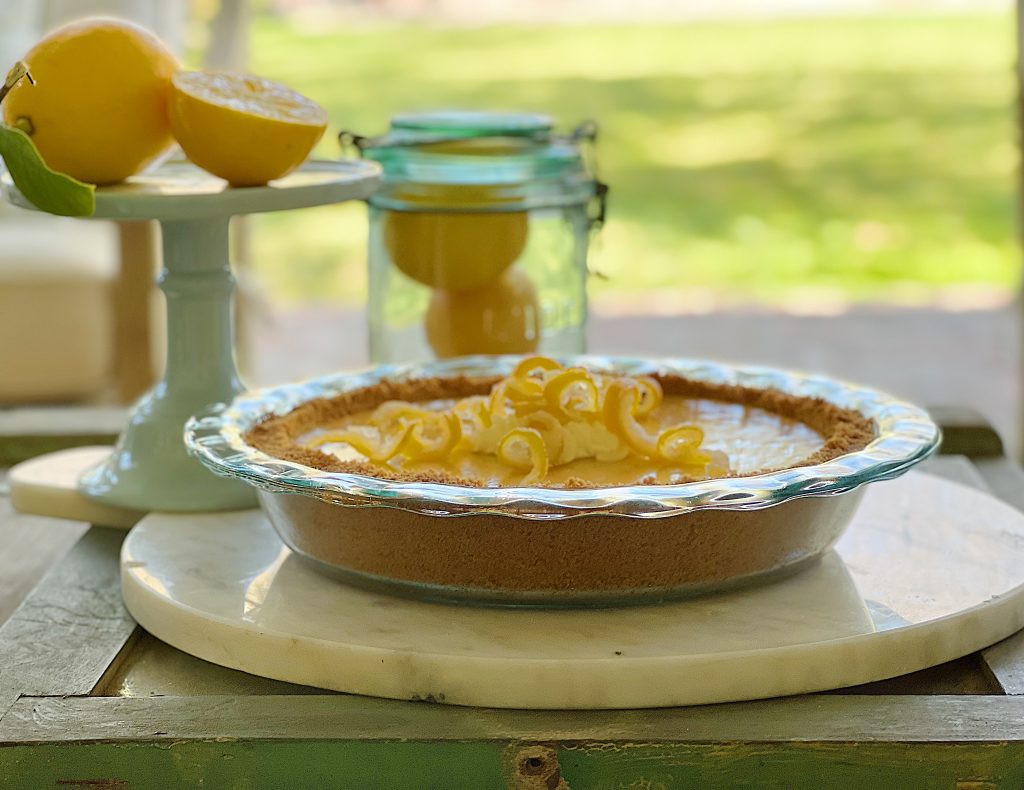
Meyer Lemon Cream Pie with a Twist
On this blog, I may sometimes use affiliate links, which means a small commission is earned if you purchase via the link. The price will be the same whether you use the affiliate link or go directly to the vendor’s website using a non-affiliate link.
Baby Clothes Shaped Sugar Cookies
Baby Clothes Shaped Sugar Cookies – My Favorite Baby Shower Cookie Centerpieces shares how you can turn sugar cookie dough into adorable baby-clothes shapes (onesies, sleepers, dresses) and turn them into a whimsical “cookie wardrobe” display by hanging them on miniature hangers, perfect as both a centerpiece and take-home party favor.
Baby Clothes Shaped Sugar Cookies

Ingredients
- Sugar Cookies
- 2 cups all-purpose flour
- 1/4 teaspoon salt
- 1/2 teaspoon baking powder
- 1/2 cup (1 stick) unsalted butter
- 1 cup sugar
- 1 large egg, lightly beaten
- 1 tablespoons milk
- 1 TBL lemon juice
- 1/2 teaspoon pure vanilla extract
- Buttercream Frosting
- 1 cup nonsalted butter (do not warm)
- 4 cups powdered sugar
- 1 tsp vanilla
- 4-6 TBL coconut milk (I like The Kitchen Organic)
Instructions
Whisk together flour, salt, and baking powder in a medium bowl.
In the bowl of an electric mixer fitted with the paddle attachment, cream butter and sugar; add dry ingredients, and mix until incorporated. With the mixer running, add egg, milk, lemon, and vanilla; mix until incorporated.
Transfer the dough to a work surface. Shape into two discs, cover with plastic wrap, and refrigerate for at least 1 hour.
Preheat oven to 350 degrees. Line baking sheets with nonstick baking mats or parchment paper; set aside.
On a lightly floured work surface, roll out the dough to 1/8-inch thickness. Cut into desired shapes, and transfer to prepared baking sheets, leaving an inch in between. Leftover dough can be rolled and cut once more.
Bake until lightly golden, about 10 minutes; do not allow to brown. Transfer to wire racks to cool.
To make the Buttercream Frosting, Cream the butter until soft in a mixer for about two minutes. Add the sugar, vanilla, and three tablespoons of coconut milk. Add the remaining tablespoons of coconut milk as needed. When frosting cookies, make sure the cake is completely cooled. You can place them in the freezer for about thirty minutes before decorating.
The post walks through the full recipe, icing and decorating details, and clever presentation ideas that make these cookies a memorable and charming part of any baby shower.
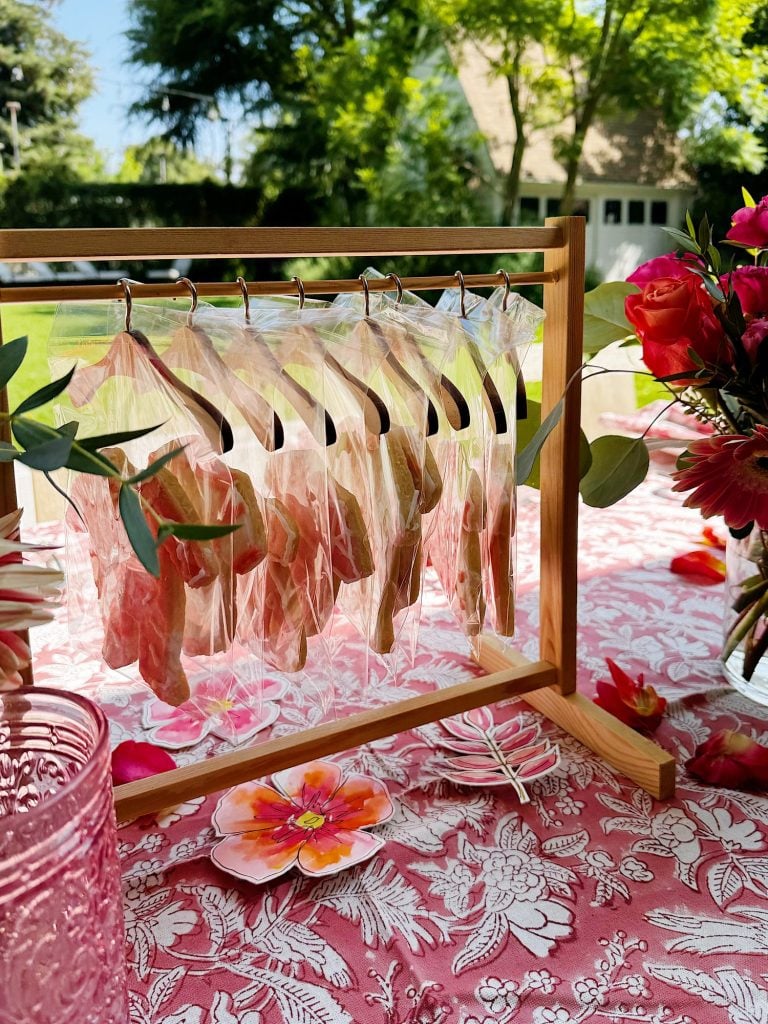
My Favorite Baby Shower Cookie Centerpieces


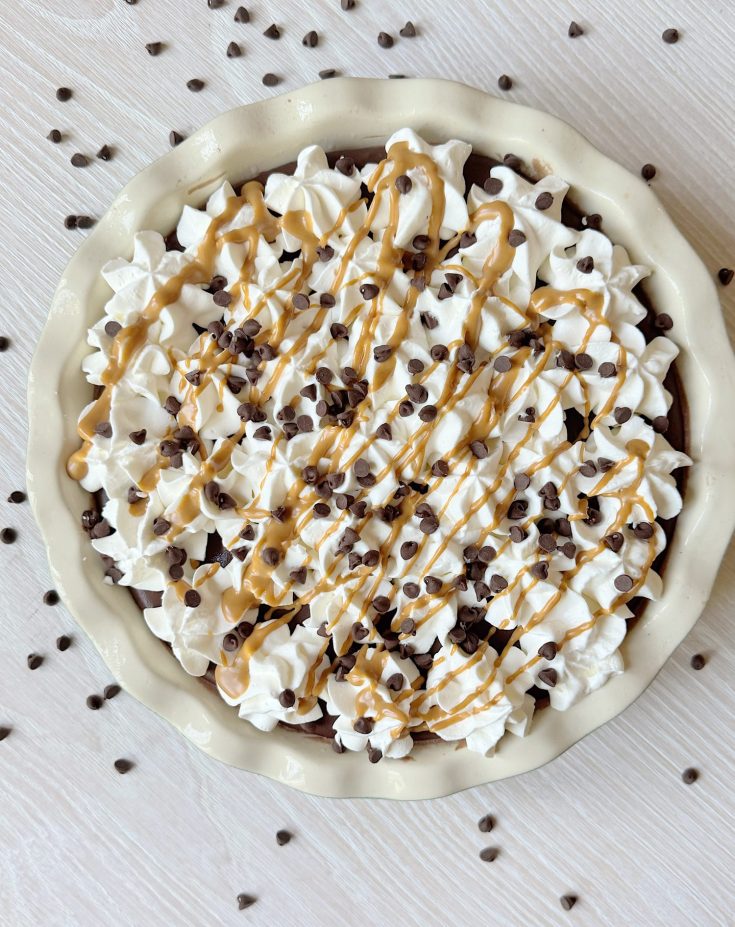
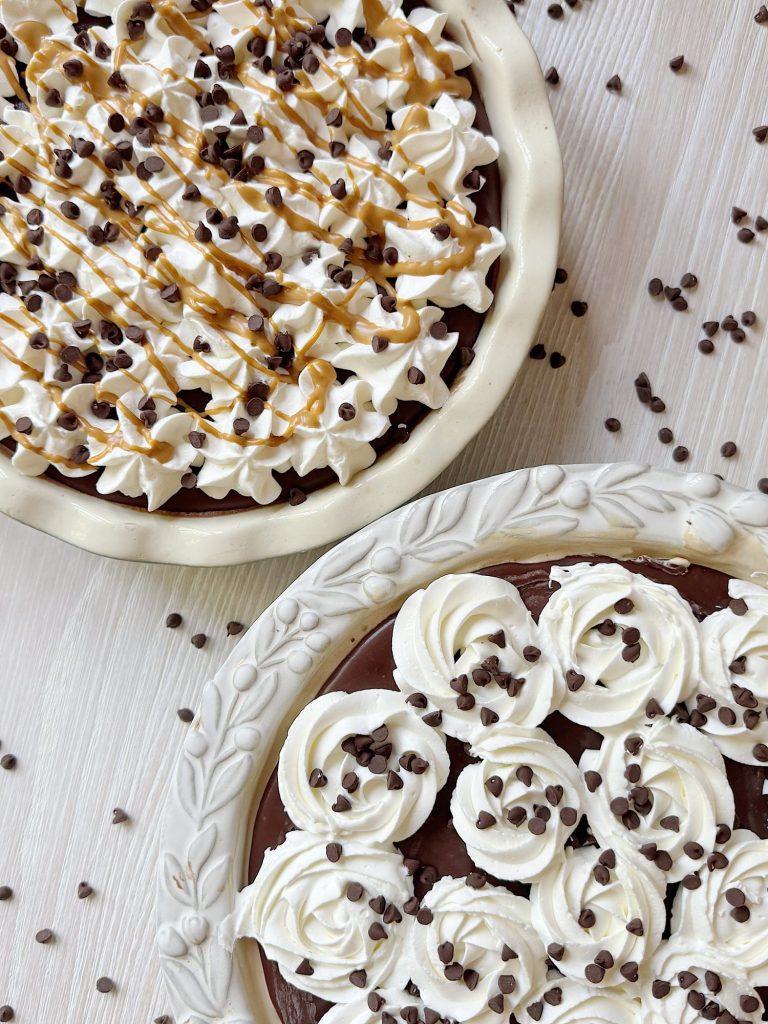
Peanut Butter Chocolate Chip Fudge Brownie Mud Pie
Peanut Butter Chocolate Chip Fudge Brownie Mud Pie shows how I made not one but two over-the-top mud pies, each built on a chewy chocolate-chip brownie crust and loaded with chocolate chips, whipped cream, and indulgent fillings, one classic and one Reese’s-inspired peanut butter-chocolate version.
Peanut Butter Chocolate Chip Fudge Brownie Mud Pie
Ingredients
- For the brownie crust:
- 1 box fudge brownie mix (plus ingredients listed on the box)
- ½ cup semi-sweet chocolate chips
- For the filling:
- 1 quart peanut butter chocolate ice cream (softened slightly)
- ½ cup mini chocolate chips
- For the chocolate ganache:
- ¾ cup heavy cream
- 6 oz semi-sweet chocolate chips
- Optional peanut butter drizzle:
- ½ cup creamy peanut butter (warmed slightly for drizzling)
- Garnish:
- 2 cups heavy cream
- 1/4 cup sugar
- 1 tbsp clear vanilla
- mini chocolate chips
Instructions
1. Make the brownie crust:
- Prepare the brownie mix as directed on the box.
- Stir in ½ cup chocolate chips for extra texture and indulgence.
- Pour about 1" brownie dough into a greased 9-inch deep-dish pie pan or springform pan. Reserve the extra to make more brownies!
- Bake for 25-30 minutes until set but still fudgy (don’t overbake—you want it gooey).
- Let cool completely. (Speed things up by chilling it in the fridge.)
2. Fill with ice cream:
- Sprinkle ½ cup mini chocolate chips on top of the ice cream layer.
- Place in the freezer for at least 2-3 hours, or until firm.
3. Make the ganache:
- Heat the heavy cream until just simmering.
- Pour over the chocolate chips and let sit for 2 minutes.
- Stir until smooth and glossy.
- Let cool slightly, then pour over the frozen pie.
- Return to the freezer for at least 1 hour to set.
4. Garnish and serve:
- Place whipped cream, sugar, and vanilla in an electric mixer and whip to form stiff peaks.
- Fill a pastry bag with the whipped cream and decorate the top of the mud pie.
- Melt 1/4 cup peanut butter in the microwave for 30 seconds. Make sure it will pour but that it's not too hot.
- Pour over the top of the pie.
- Sprinkle with chocolate chips.
- Slice and serve straight from the freezer.
The post walks you through the full recipes, assembly steps, and party-ready presentation so you can recreate these decadent pies and wow your guests at your next gathering.
Let’s Celebrate Chocolate Chip Day with Two Over-the-Top Mud Pies

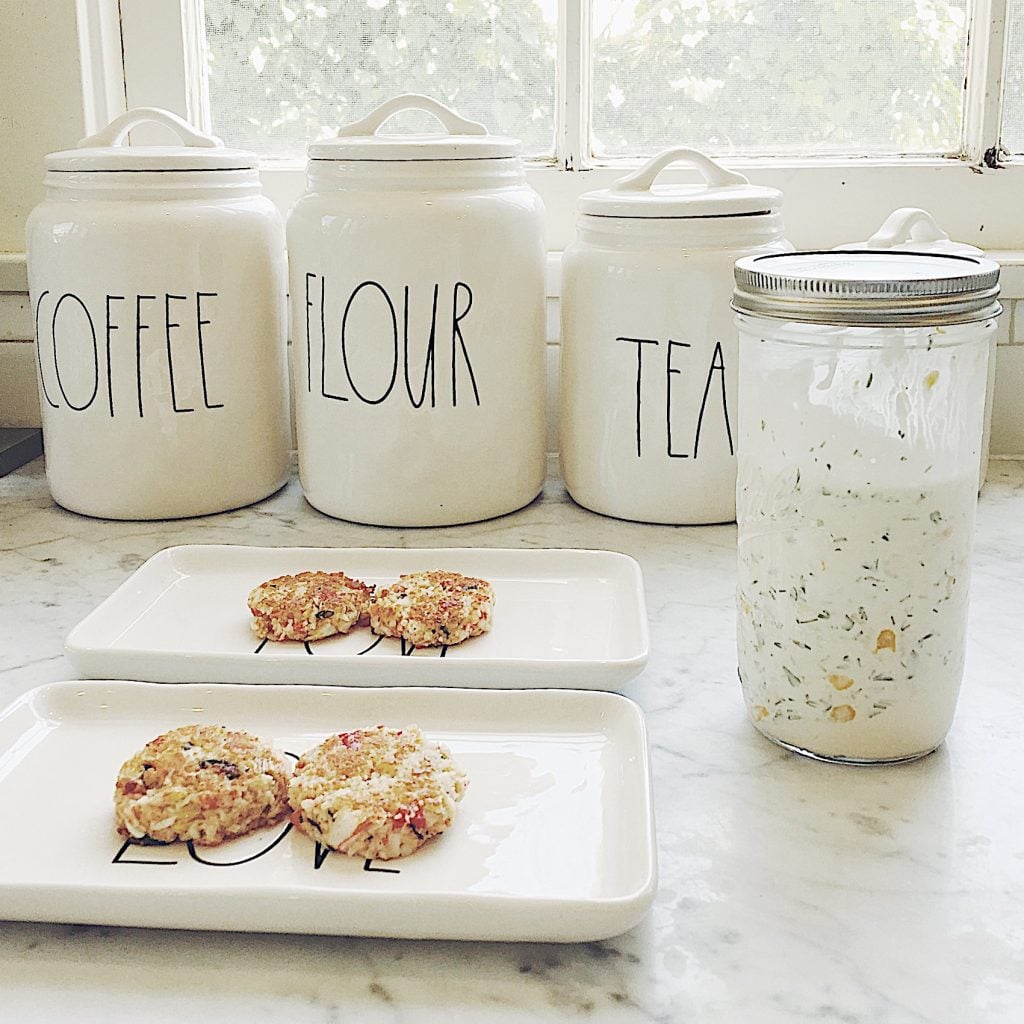
The Best Mini Crab Cakes Recipe
The Best Mini Crab Cakes Recipe presents a simple, crowd-pleasing recipe for mini crab cakes served with a tangy lemon-dill sauce, perfect for entertaining or appetizers at any gathering.
The Best Crab Cakes Recipe with Lemon Dill Sauce
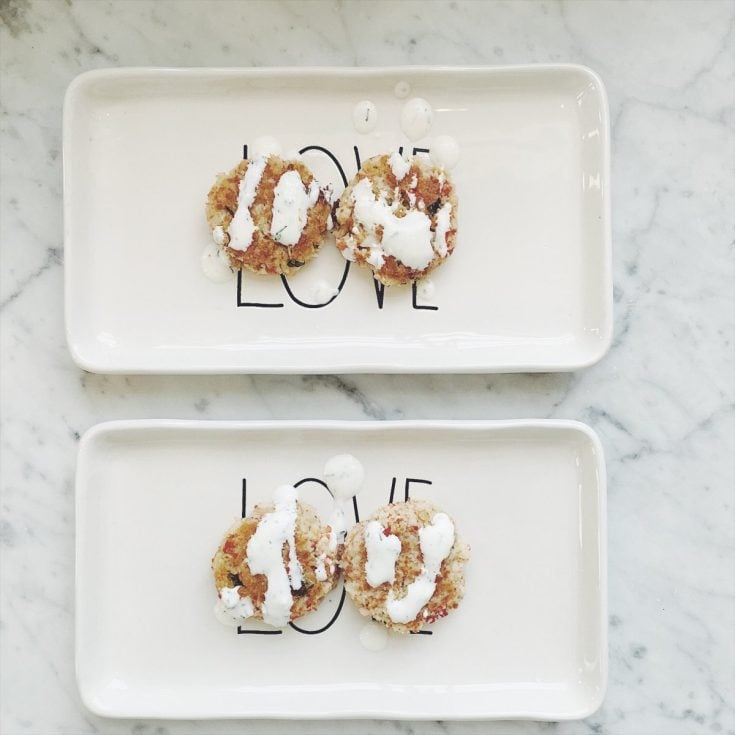
These crab cakes with lemon dill sauce are to die for. They aren't "fishy" and are by far the most popular appetizer anytime I make them.
Ingredients
- Crab Cakes
- 3 TBL butter
- 1 scallion, chopped fine
- 1 glove garlic, minced
- 2 TBL red bell pepper, chopped fine
- Ground red pepper (cayenne) to taste
- 3 TBL heavy cream
- 1 TBL dijon mustard
- 1 egg, beaten
- 1 tsp minced fresh basil
- 1 tsp minced fresh parsley
- 1 cup fine dry bread crumbs
- 1 pound fresh lump crabmeat
- 1/4 cup parmesan cheese
- 2 TBL vegetable oil
- Lemon Dill Sauce
- 3/4 cup mayonnaise
- 1/2 cup buttermilk
- 2 TBL fresh dill chopped
- 1 TBL minced fresh parsley
- 2 tsp fresh lemon juice
- 1 TBL grated lemon peel
- 1 clove garlic, minced
Instructions
Crab Cakes
- Lightly chop the crab meat in the food processor and set aside.
- Melt one TBL of the butter in a large skillet and saute the scallion, garlic and red bell pepper until wilted, about 2 minutes.
- Add the ground red pepper, cream and mustard.
- Cool slightly. Add the egg, basil, parsley, 1/2 cup of the bread crumbs, and the crabmeat.
- Mix lightly. Mold into 25 one-inch wide patties.
- Combine the remaining 1/2 cup of bread crumbs and the parmesan cheese in a shallow dish.
- Roll the patties in the crumb and cheese mixture.
- Chill for at least one hour. (The crab cakes can be made one day prior and refrigerated, covered, up to this point.)
- Combine the oil and the remaining 2 TBL of butter over moderate heat in a large skillet.
- Saute the crab cakes 3 minutes on each side.
Lemon Dill Sauce
- Combine all ingredients in a medium bowl.
- Chill until the mixture thickens.
Notes
The Lemon Dill Sauce in this recipe is also really great with salmon (baked or smoked).
The post emphasizes how mild and flavorful the crab cakes are, never “fishy”, and shares why they’ve become a go-to recipe for holiday parties and large get-togethers.
The Best Mini Crab Cakes Recipe
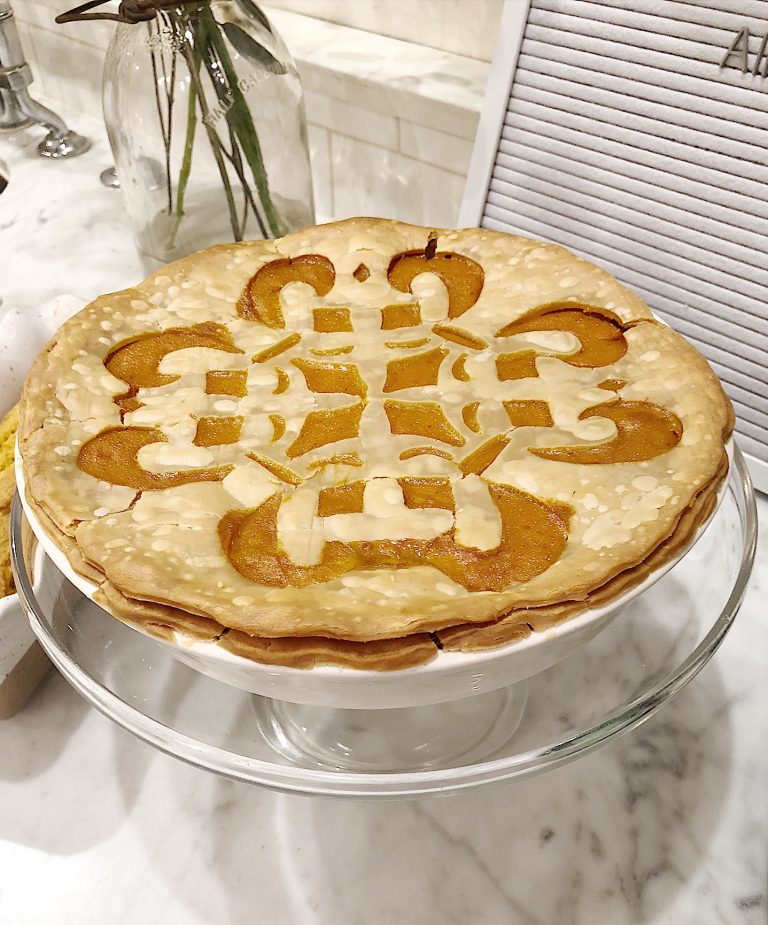
Apple Pie with Flaky Sourdough Pie Crust
Apple Pie with Flaky Sourdough Pie Crust shows how to combine a tangy sourdough-based crust with a classic apple filling to create a pie that’s flaky, buttery, and full of character thanks to the natural fermentation of the sourdough.
Apple Pie with Flaky Sourdough Pie Crust
This Apple Pie recipe combines the tangy richness of sourdough with the classic apple pie ... a flaky sourdough pie crust with layers of buttery goodness and a tender, flavorful apple filling.
Ingredients
- For the Sourdough Pie Crust:
- 375g (3 cups) all-purpose flour
- 337g (1½ cups) unsalted butter, cold and cubed
- 150g (3/4 cup) sourdough starter discard (unfed starter)
- 1 tablespoon sugar (optional, for slightly sweet crust)
- 2 teaspoons salt
- 4-6 tablespoons ice-cold water
- For the Apple Filling:
- 6 large apples (Granny Smith, Honeycrisp, or a mix), peeled, cored, and sliced
- 100g (½ cup) granulated sugar
- 50g (¼ cup) brown sugar
- 1 teaspoon ground cinnamon
- ¼ teaspoon ground nutmeg
- 1 tablespoon lemon juice
- 1 tablespoon cornstarch
- 1 tablespoon butter (for dotting the filling)
- 1 egg (for egg wash)
- 1 tablespoon coarse sugar (for sprinkling on top)
Instructions
Step 1: Prepare the Sourdough Pie Crust
- Mix the dry ingredients: Combine the all-purpose flour, sugar (if using), and salt in a large bowl.
- Cut in the butter: Add the cold, cubed butter to the flour mixture. Using a pastry cutter or your fingers, work the butter into the flour until it resembles coarse crumbs with some pea-sized butter pieces remaining. This step ensures a flaky crust.
- Incorporate the sourdough starter: Add the sourdough starter discard to the flour and butter mixture. Stir gently with a fork or your hands until the dough comes together.
- Add cold water: Add 4- 6 tablespoons of ice-cold water to the mixture. Gently stir or knead the dough until it just comes together. If the dough is too dry, add a tablespoon of water at a time, but be careful not to overwork it.
- Chill the dough: Divide the dough in half and form two discs. Wrap each disc in plastic wrap and refrigerate for at least 1 hour (or up to 24 hours). This resting time allows the butter to firm up and the sourdough starter to enhance the dough’s flavor.
Step 2: Prepare the Apple Filling
- Slice the apples: Toss the sliced apples with lemon juice in a large bowl to prevent browning.
- Mix the sugars and spices: In a small bowl, combine the granulated sugar, brown sugar, cinnamon, nutmeg, and cornstarch. Sprinkle this mixture over the apples and toss until the apples are evenly coated. Set aside while you roll out the dough.
Step 3: Assemble the Pie
- Roll out the crust: Remove one disc of pie dough from the refrigerator. Roll it out into a 12-inch circle on a lightly floured surface, about ⅛ inch thick. Gently transfer it to a 9-inch pie dish, allowing the excess dough to hang over the edges.
- Add the apple filling: Pour the prepared apple filling into the pie crust, mounding it slightly in the center. Dot the filling with small pieces of butter.
- Roll out the top crust: Roll out the second disc of dough in the same way. Place it over the apples. Trim any excess dough, leaving about 1 inch of overhang around the edge of the pie. Tuck the top crust under the bottom crust edge and crimp the edges with a fork or your fingers to seal.
- Add a decorative top crust: I cut strips and wove them on top for this pie. I love this look.
- Create air vents: Use a sharp knife to cut a few small slits in the top crust to allow steam to escape during baking. You can also create decorative designs if desired.
Step 4: Bake the Pie
- Preheat the oven: Preheat your oven to 400°F (200°C).
- Egg wash and sprinkle: In a small bowl, beat the egg with one tablespoon of water to create an egg wash. Brush the top of the pie with the egg wash and sprinkle with coarse sugar for a golden, crunchy finish.
- Bake the pie: Wrap the edges of the crust in aluminum foil so they don't get too brown. Place the pie on a baking sheet to catch any drips. Bake at 400°F for 20 minutes, then reduce the oven temperature to 350°F (175°C) and continue baking for another 40-45 minutes until the crust is golden brown and the apple filling is bubbling.
- Cool the pie: Once baked, remove it from the oven and let it cool on a wire rack for at least 2 hours before slicing. This cooling time allows the filling to set.
The post walks you through step-by-step crust preparation, filling assembly, and baking to elevate a traditional apple pie with artisan technique.
Apple Pie with Flaky Sourdough Pie Crust
The Best Spring Cake
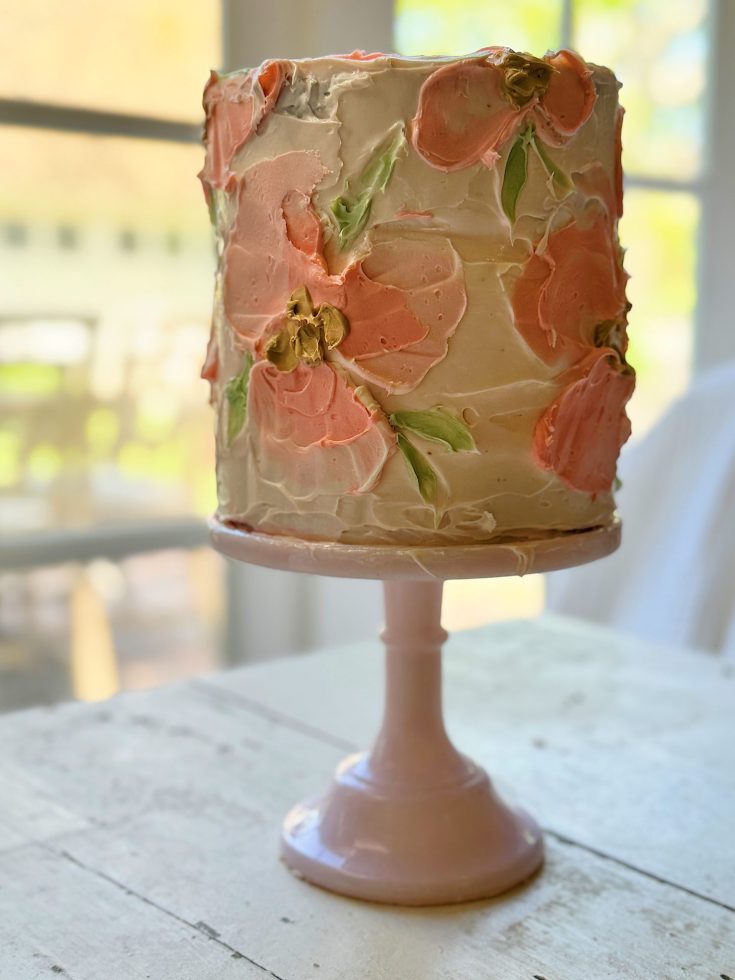
The Best Spring Cake shares how to bake and decorate a stunning three-tier cake topped with buttery floral frosting, perfect for spring celebrations like birthdays, showers, or special gatherings.
The Best Spring Cake
Ingredients
- 3 cups all-purpose flour
- 2 cups granulated sugar
- 1 tablespoon baking powder
- 1 teaspoon salt
- 1 cup unsalted butter, softened
- 1 cup whole milk
- 4 large eggs
- 2 teaspoons vanilla extract
- Three 6" cake pans (if you only have two, just bake the third pan separately)
Instructions
- Preheat your oven to 350°F (175°C). Grease and flour three 6-inch round cake pans and line the bottoms with parchment paper.
- Sift the flour, sugar, baking powder, and salt in a large mixing bowl.
- Add the softened butter to the dry ingredients and mix quickly until the mixture resembles coarse crumbs.
- Whisk together the milk, eggs, and vanilla extract in a separate bowl until well combined.
- Gradually pour the wet ingredients into the dry ingredients, mixing on medium speed until the batter is smooth and well combined.
- Divide the batter evenly among the prepared cake pans, smoothing the tops with a spatula.
- Bake in the preheated oven for 25-30 minutes or until a toothpick inserted into the center of the cakes comes out clean.
- Remove the cakes from the oven and let them cool in the pans for 10 minutes before transferring them to wire racks to cool completely.
The post walks you through every step, from batter to bake to palette-knife buttercream flowers, so you can create a cake that looks as beautiful as it tastes.
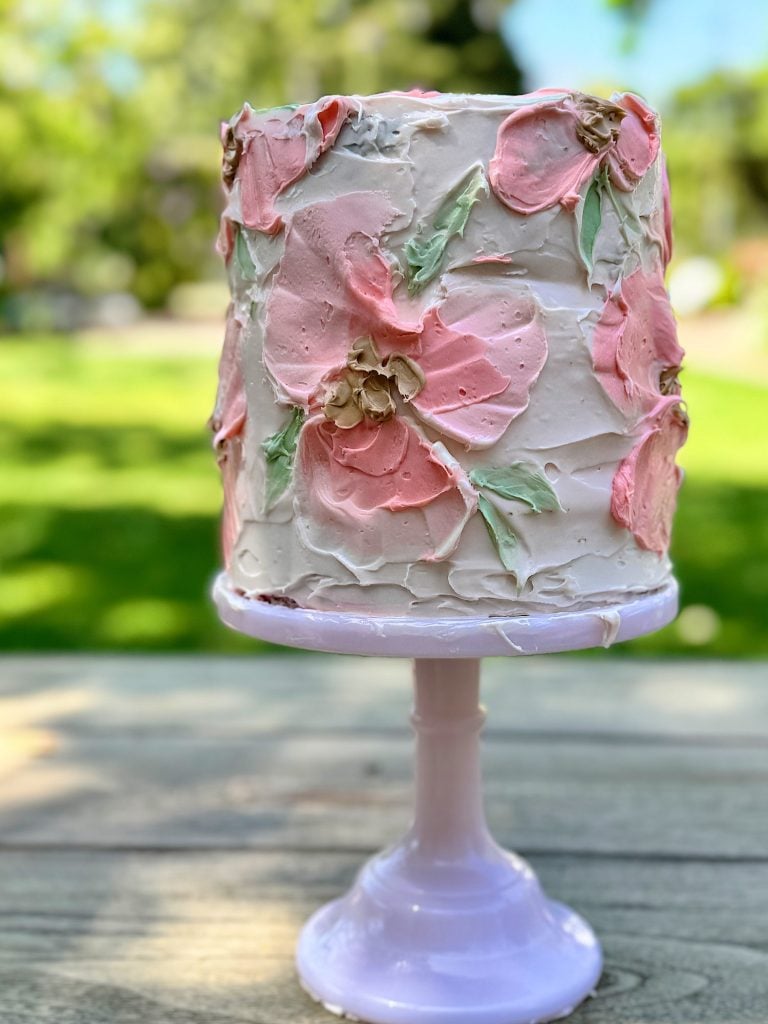
The Best Spring Cake
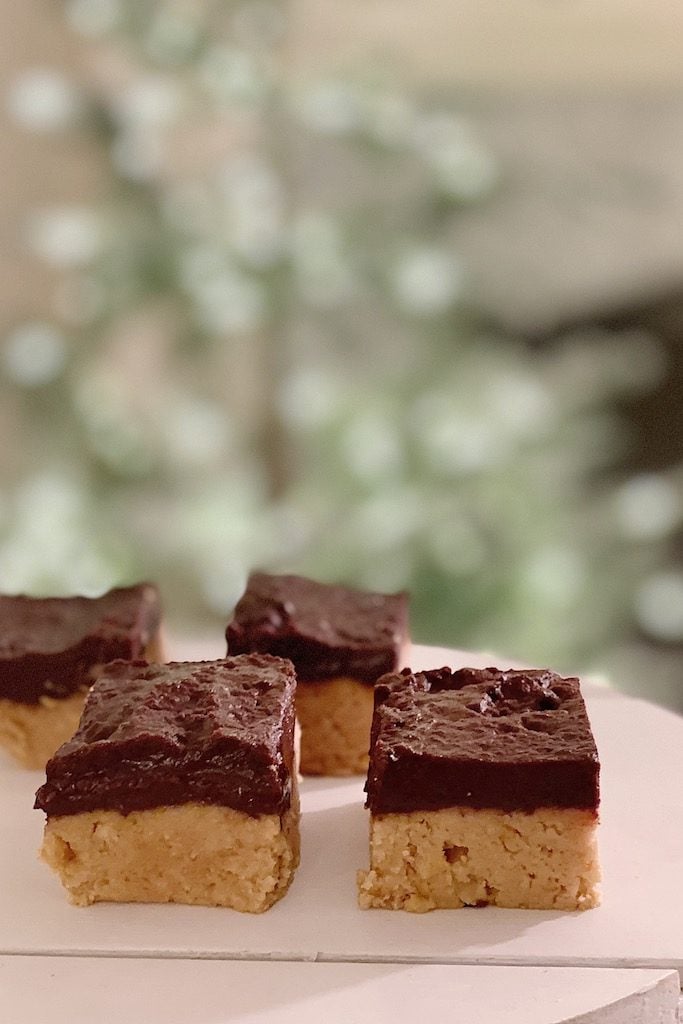
The Best Peanut Butter Fudge
The Best Peanut Butter Fudge shares a simple, five-ingredient recipe for rich, sweet-and-salty peanut butter fudge, perfect for holiday parties, desserts, or gifting, built with a graham-cracker–peanut butter base topped with melted chocolate.
The Best Ever Peanut Butter Fudge
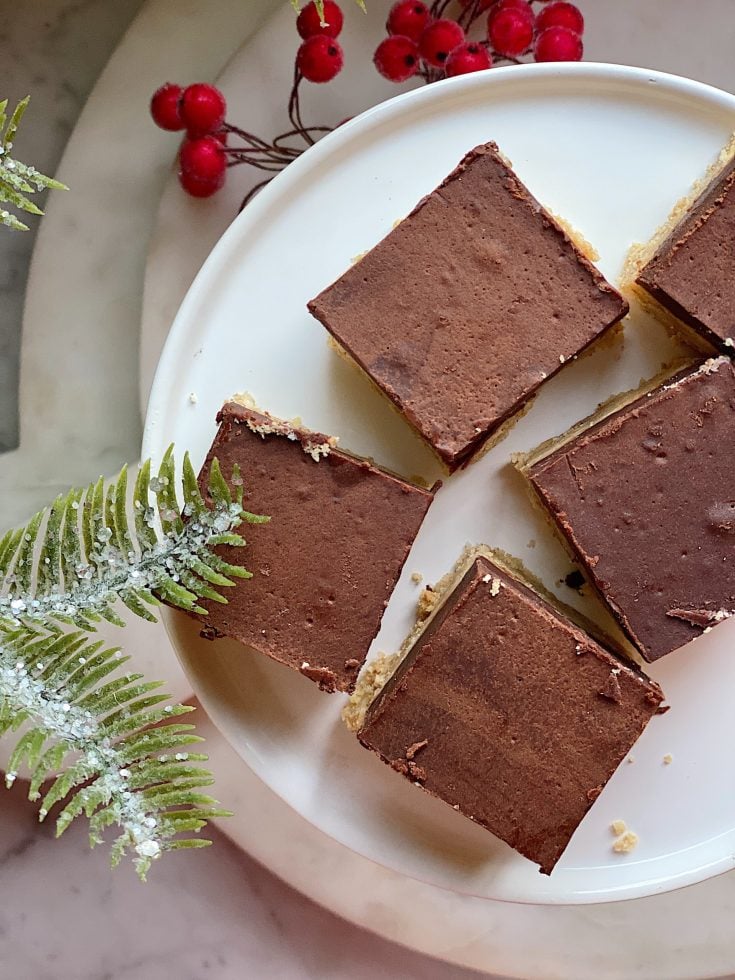
This is a sweet and salty fudge consisting of a peanut butter graham cracker crust topped with melted chocolate.
Ingredients
- 1 16 oz. box of powdered or confectioners sugar
- 2 cups graham cracker crumbs
- 1 8 oz. jar chunky peanut butter
- 1 cup butter, melted
- 1 12 oz. package semi-sweet chocolate chips
- 1/2 cup butter
Instructions
- Mix the powdered sugar, graham cracker crumbs, peanut butter, and a cup of melted butter into a 6" x 6" square baking pan. Press firmly in the pan to form a flat crust.
- Meanwhile, melt 1/2 cup of butter with chocolate over low heat. Stir until smooth. Pour chocolate over peanut butter mixture, smoothing with a spatula. Refrigerate twenty minutes. Cut into 1" squares and refrigerate until firm.
The post walks you through every step, explains why this fudge has been a holiday staple for thirty years, and gives storage tips so you can make it ahead or freeze extras for later.
My Famous Peanut Butter Fudge Recipe

Fire Roasted Tomato Bisque with Grilled Cheese Sticks
The Best Dinner Party Recipes offers a complete, elegant dinner menu featuring standout recipes like a cozy fire-roasted tomato bisque served with grilled-cheese sticks and a delicate sea bass glazed with soy and topped with ginger butter sauce.
Fire Roasted Tomato Bisque with Grilled Cheese Sticks
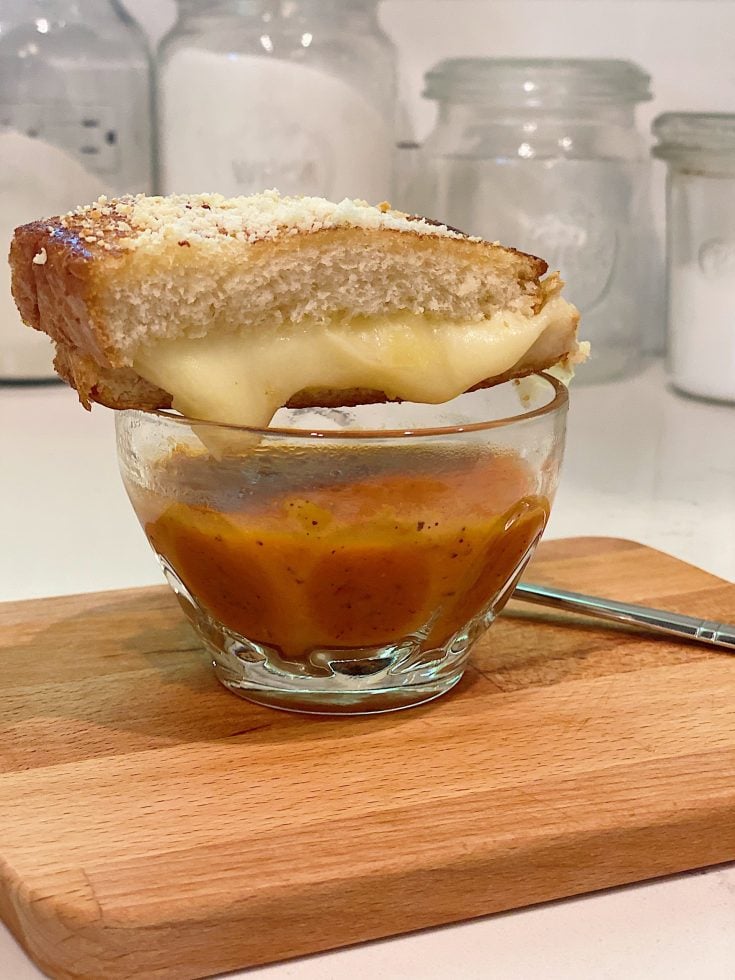
This Fire Roasted Tomato Bisque Soup and Grilled Cheese Sticks is one of the best soup recipes I have ever tasted. It is delicious.
Ingredients
- 3 tablespoon olive oil
- 1 tablespoon butter
- 2 Cups finely chopped yellow onions
- 1 tablespoon minced garlic
- 3 Cups Chicken Stock/Broth
- 1 28oz can and 1 14.5 oz can crushed fire roasted tomatoes
- ½ cup half and half
- 4 leaves fresh basil, finely chopped
- Salt and pepper to taste
- 1 loaf of Texas Toast
- 1 brick gruyere cheese, sliced thinly
- 1 brick sharp white cheddar cheese, sliced thinly
- 1 brick mozzarella cheese, sliced thinly
- 4 tablespoon olive oil
- 4 tablespoon butter
Instructions
Fire Roasted Tomato Bisque
- Place olive oil and butter in saucepan over low to medium heat. When oil and butter are combined and bubbly add onions and garlic. Cook until onions are translucent and beginning to brown. Remove from heat.
- In stock pot on low to medium heat, add chicken stock/broth, both cans of tomatoes (do not drain). Stir to combine. Add onions, garlic and oil.
- Add half and half and basil to pot, stir to combine. Season to taste with salt and pepper. Once combined and cooked through, remove from heat.
- Transfer soup to blender. Pulse until smooth.
- Return to pot. Soup can be made ahead and refrigerated. When ready to serve, warm slowly before serving.
Grilled Cheese Sticks
- Cut away crusts from bread. To assemble each sandwich, use two pieces of bread. Layer slices of gruyere on top of the bread. On top of the gruyere, layer the sharp white cheddar cheese slices. On top of the cheddar cheese, layer the mozzarella slices.
- In a saucepan, over medium heat, add 1 TBL of olive oil and 1 TBL of butter. Once the olive oil and butter is combined and bubbly.
- Carefully transfer the bread layered with cheese into the pan, bread side down. Place the second piece of bread on top of cheese.
- When the bread is golden brown, carefully flip the sandwich to brown the second piece of bread.
- Once both sides of the bread are browned, transfer the sandwich to a cookie sheet, lined with parchment paper.
- Place in oven heated to 300 degrees. Bake sandwich for 10-12 minutes until cheeses are melted.
- Cut sandwiches in half and serve with soup.
Sea Bass with Soy Glaze and Ginger Butter Sauce
Sea Bass with Soy Glaze and Ginger Butter Sauce
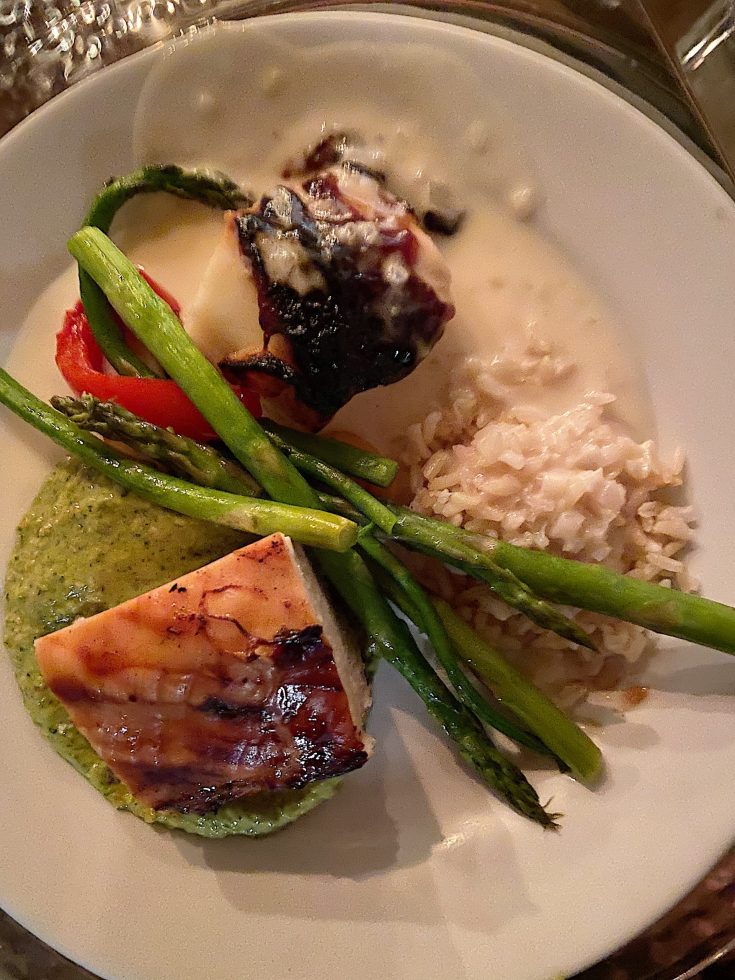
When I need to impress my guests, I serve this sea bass. It really is that good!
Ingredients
- 6 tablespoon Soy Sauce
- 3 tablespoon Honey
- 3 teaspoon Rice Wine Vinegar
- 1 ½ teaspoon Cornstarch
- 3 tablespoons of water
- 1 cup dry white wine
- ⅓ cup chopped shallots
- ⅓ cup chopped fresh ginger
- ½ cup heavy whipping cream
- 4 6-to-7 ounce sea bass fillets
- 4 tablespoon chilled butter, cut into small pieces
Instructions
Soy Glaze
- Mix together soy sauce, honey and rice wine vinegar in a small saucepan over low heat.
- In a small bowl, mix water and cornstarch until smooth. Add water/cornstarch mixture to saucepan.
- Stir mixture over medium to high heat until the glaze is thickened slightly, about 2 minutes.
- Remove from heat and cool mixture to room temperature. Glaze can be prepared 1 day ahead. If making ahead, cover and refrigerate.
Ginger Butter Sauce
- Combine wine, shallots and ginger in small saucepan over high heat.
- Boil until liquid is reduced ¼ cup, about 5 minutes. Add cream and boil until liquid is reduced by half, about 3 minutes.
- Remove from heat. Sauce can be prepared 1 day ahead. If making ahead, cover and refrigerate.
Sea Bass
- Preheat oven to 350.
- Cover baking sheet with parchment paper. Arrange fish on baking sheet.
- If glaze has been refrigerated, bring to room temperature.
- Brush glaze onto fish and bake until opaque in center, about 15 minutes. Remove from oven.
- While fish is baking, bring ginger butter sauce to simmer. Remove from heat and add butter to sauce pain whisking until melted.
- Season to taste with salt and pepper. Spoon over baked fish and serve.
The post provides clear, crowd-friendly instructions and ideas for plating and presentation — perfect for hosting a memorable dinner with friends or family.

The Best Dinner Party Recipes


Kouign Amann
Kouign Amann – The Best Recipe for Kouign-Amann provides a clear, step-by-step guide to baking the flaky, buttery French pastry at home, from rolling and layering the dough to caramelizing the sugar. Hence, you get crisp, golden layers that melt in your mouth.
Kouign-Amann
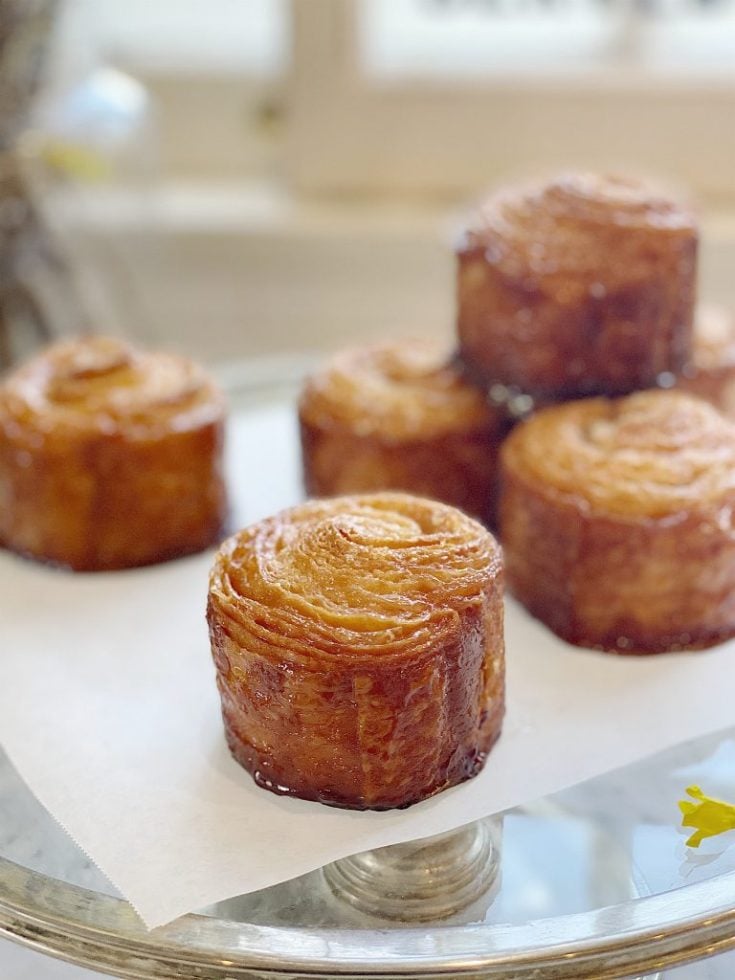
The kouign-amann is pronounced "queen a-mahn" and is from Brittany, France. It's like a cross between a croissant and a palmier, with layer after layer of buttery, flaky pastry on the inside, yet caramelized with ever-so-slightly-burnt sugar on the outside.
Ingredients
- DOUGH:
- 400 g (3 cups and 3 tablespoons) bread flour
- 236 g (1 cup) ice water
- 10 g (1 1/2 teaspoons) salt
- 14 g (1 tablespoon) butter
- 5 g (scant two teaspoons) instant yeast
- BUTTER BLOCK:
- 339 g (3 sticks) butter
- *NOTE: use a higher quality butter if possible for the butter block *
- SUGAR MIX:
- 250 g (1 1/4 cup) sugar
- 1/4 teaspoon salt
Instructions
- Scale all the ingredients for the dough into the bowl of a stand mixer. Mix on low speed for 2 minutes. The dough should come together at this time. Increase mixing speed to medium, and mix for another 15-20 minutes, until the dough has strong gluten development. (You should feel resistance when you pull on it.)
- Remove dough from the bowl, and form into a flat, 8-inch x 8-inch square before wrapping in plastic wrap. Freeze for ~ 1 hour, until very cold, and slightly hardened. Flip the dough halfway through, so that it is evenly chilled.
- In the meantime, combine sugar and salt; mix well, and set aside. In a folded over piece of parchment, use a rolling pin to shape the butter into an 8-inch x 8-inch square. Use a dough scraper to straighten the sides, as necessary. Refrigerate ~ 20 minutes, until firm but still pliable.
- Once the dough and butter are both sufficiently chilled, roll out the dough as necessary to even out the thickness, and ensure that it has the same dimensions as the butter block. Then, place the butter inside the dough so that it forms a diamond within the square. Fold the edges of the dough into the middle, completely enclosing the butter. Pinch seams together.
- Roll this square packet until it is three times as long, keeping roughly the same width. You will end up with an 8.5-inch x 24-inch rectangle. Fold the rectangle into thirds. This is called “the first turn.” Rotate 90 degrees, and repeat the process once more.
- After the second turn, wrap the dough in plastic wrap, and chill in the freezer for ~ 10 minutes. Once cold, remove from the freezer and do one last fold, incorporating the sugar this time. (See video for details.)
- Rotate 90 degrees, and roll out the dough into a rectangle, 10 inches wide x 16 inches. Cut dough into 2-inch strips, and roll each one up before placing in a greased muffin tin, or greased ring mold.
- Let rise for 45-60 minutes. Preheat oven to 375 F. Bake for 45-60 minutes until golden brown. Check bottoms to make sure that dough is fully cooked; they should be golden brown as well. Remove from the oven, and use tongs to carefully remove the kouign-amanns from their muffin tin, or molds. This step should be done immediately, or else the sugar will harden into a caramel, making it impossible to extract the kouign-amanns later. Bon appetit!
The post includes helpful photos (and a video!) plus troubleshooting tips so even a first-time baker can achieve that perfectly laminated, decadent result.
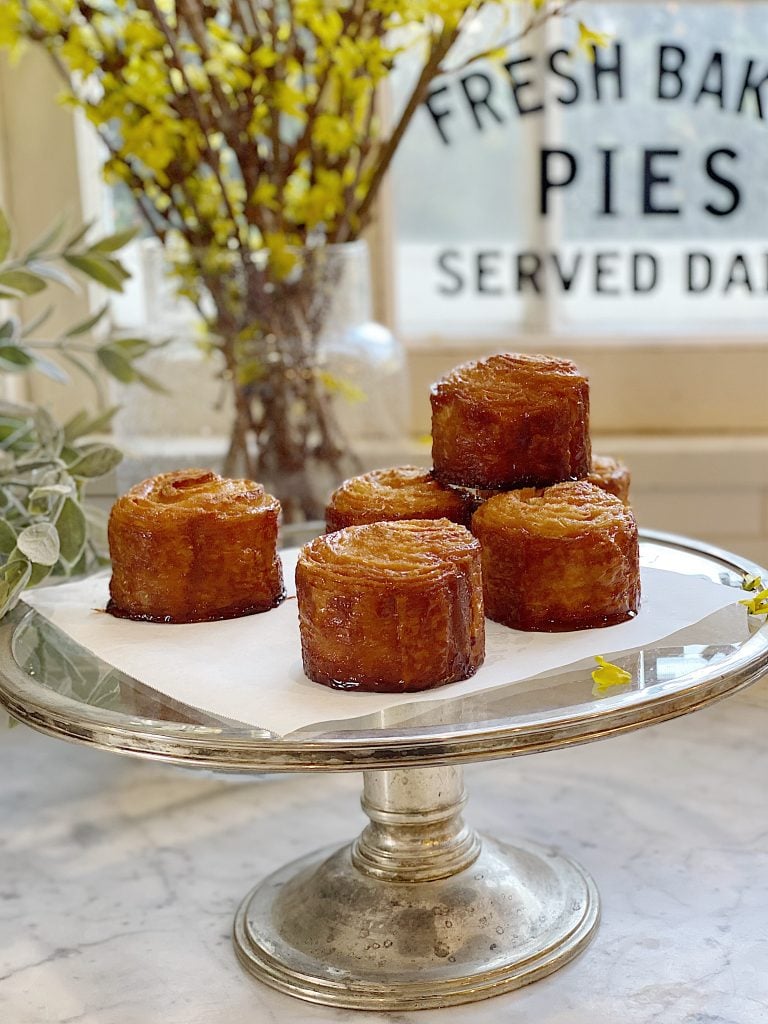
The Best Recipe for Kouign-Amann

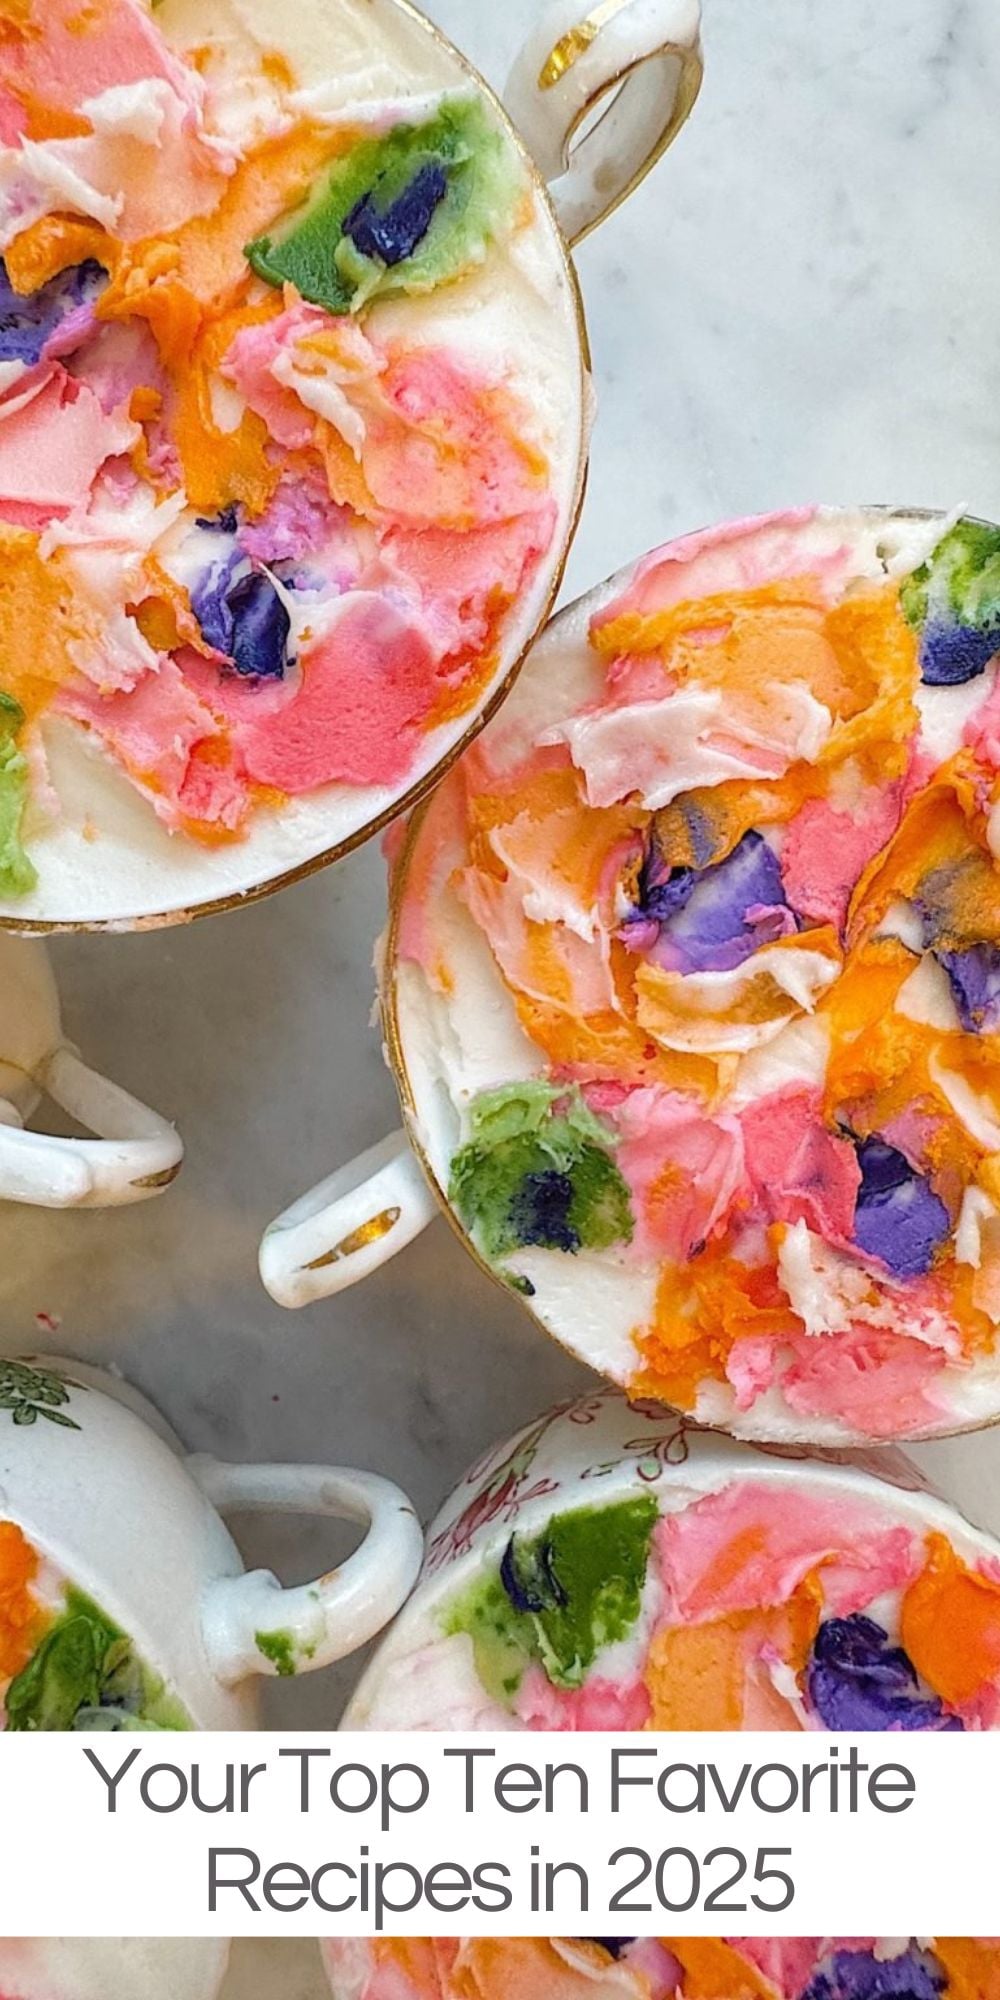
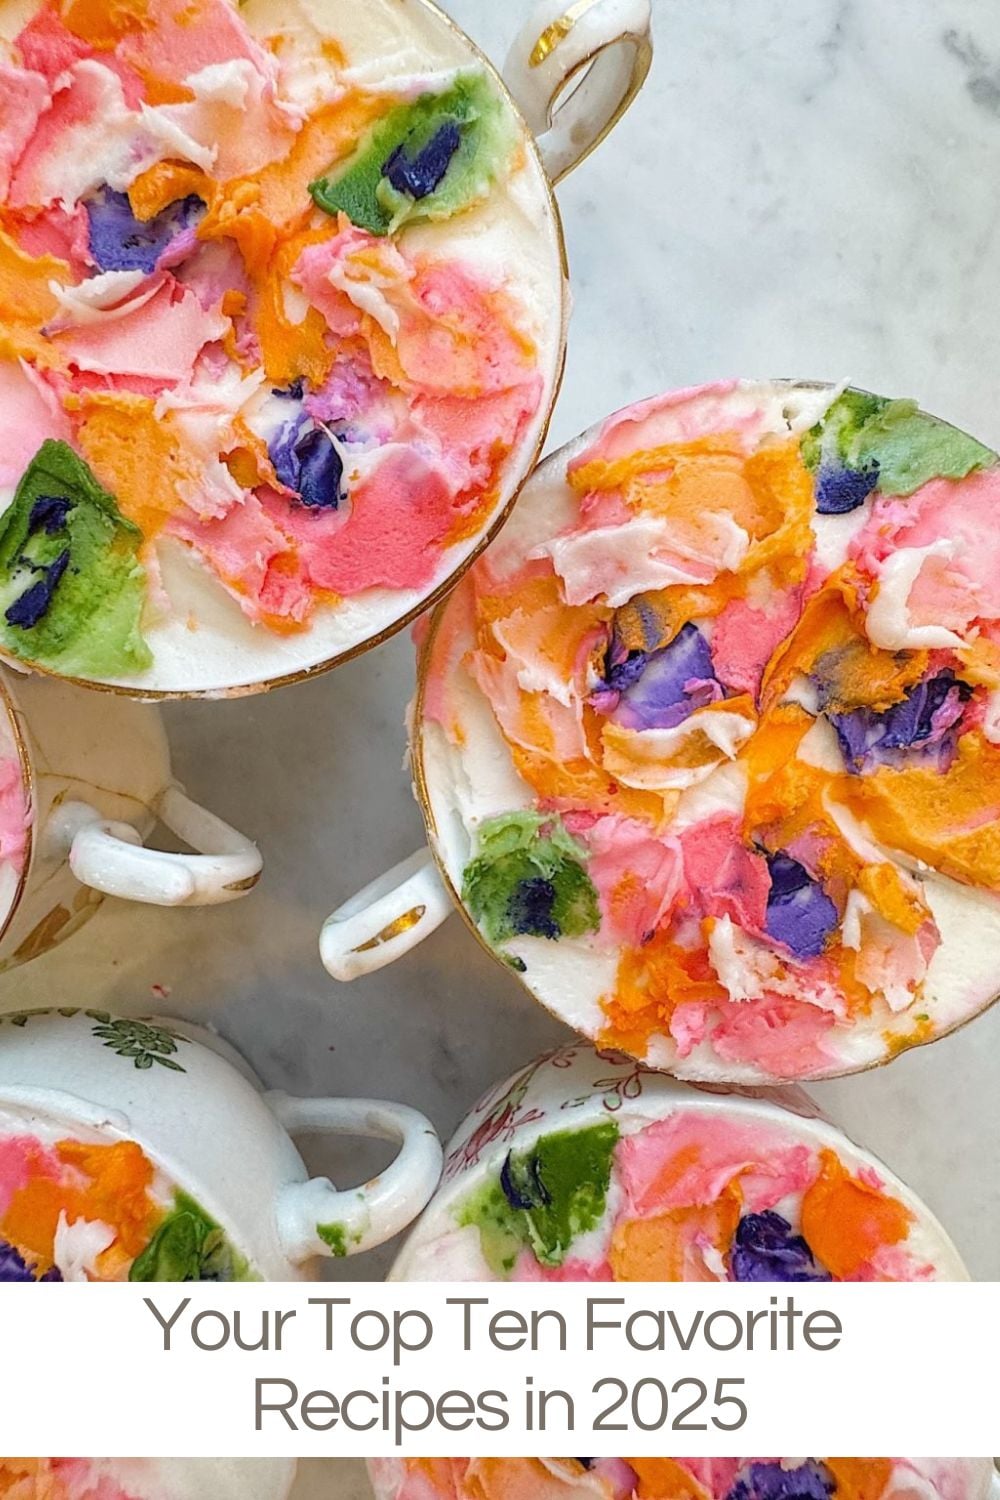
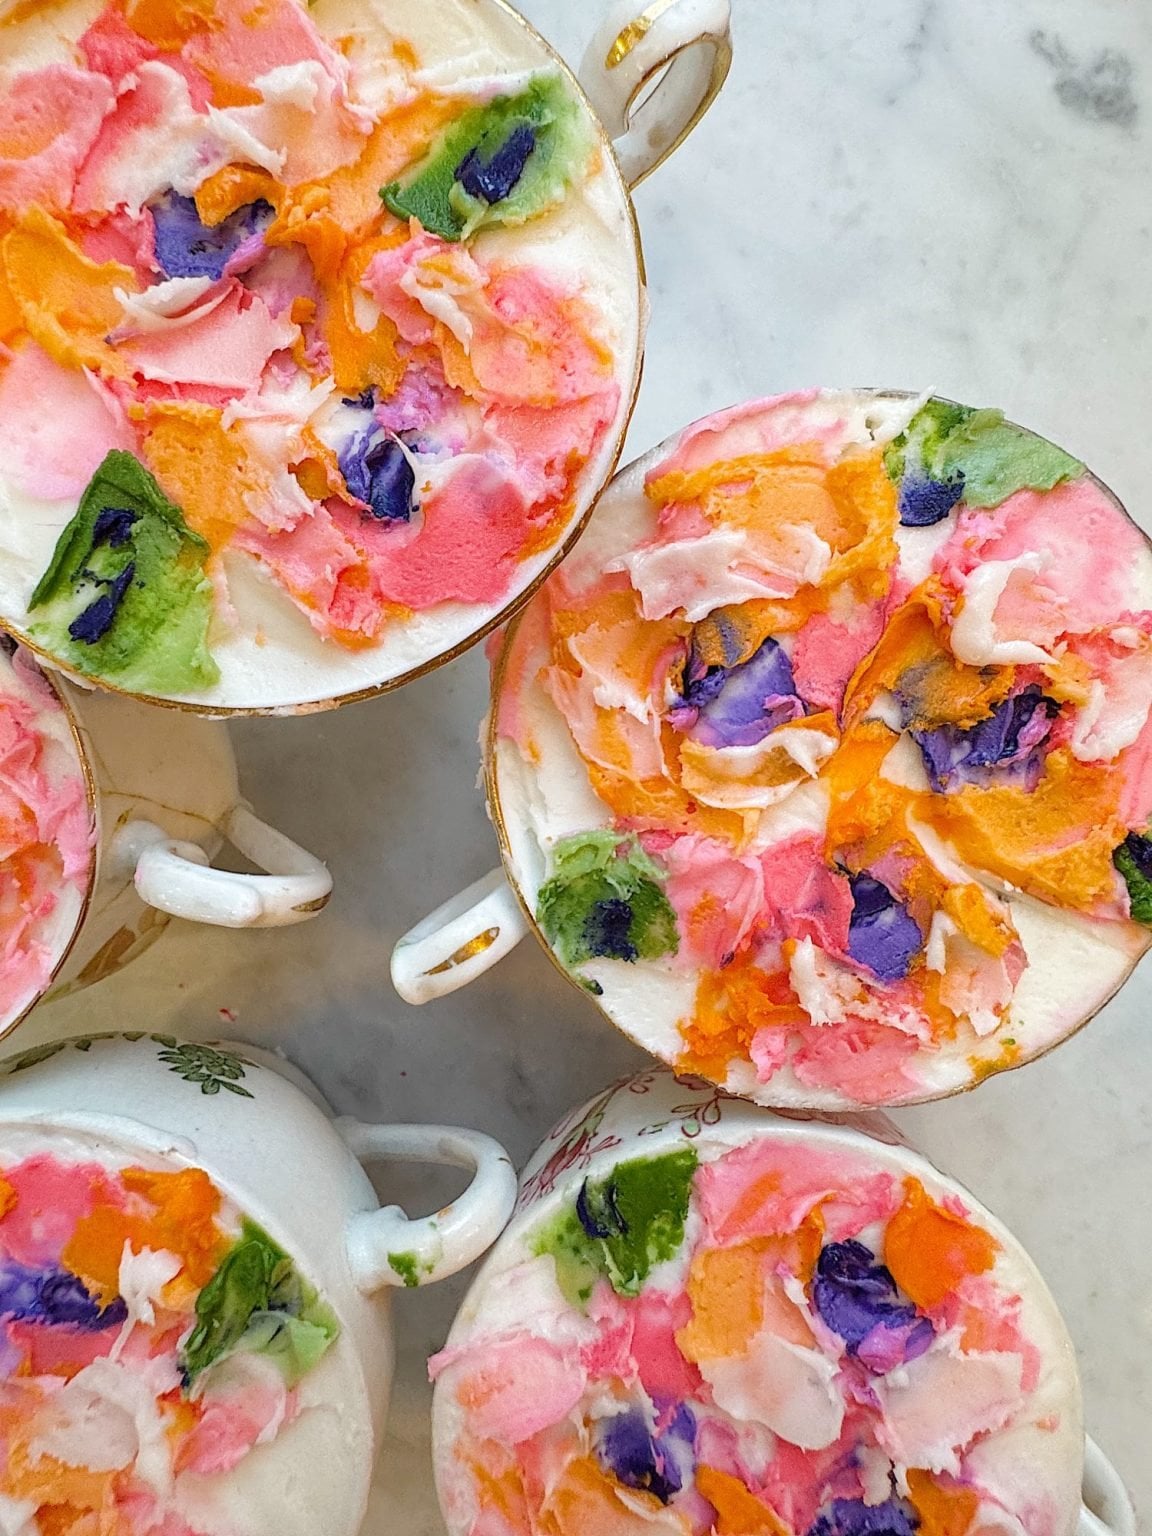
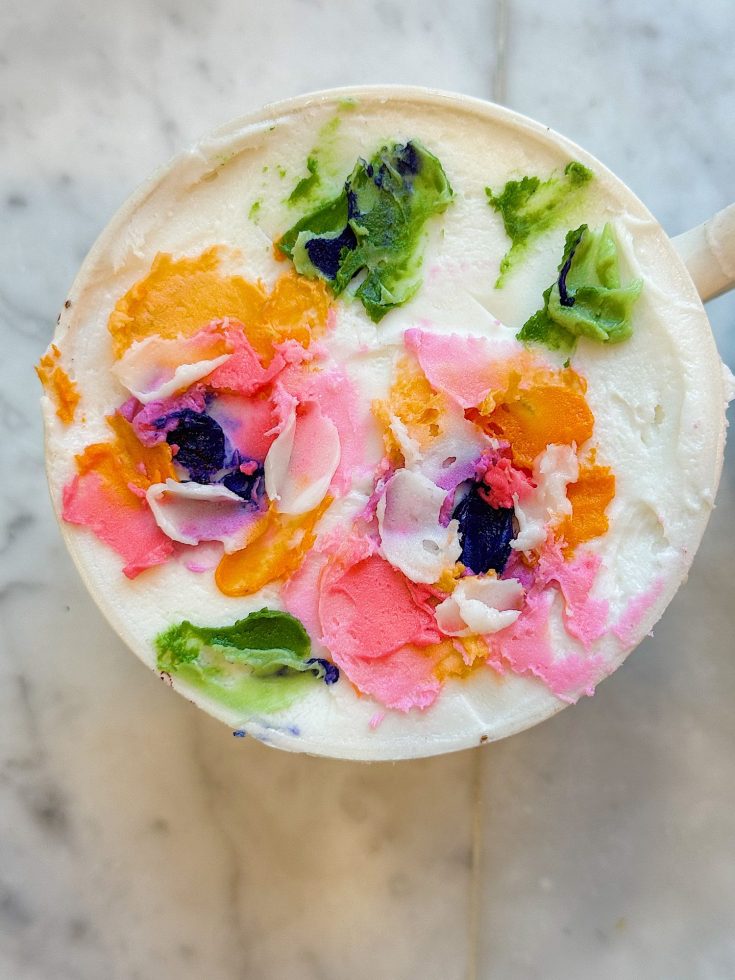
The Cutest Floral Dessert Tea Cups
The Cutest Floral Dessert Tea Cups shows you how to turn vintage floral teacups into whimsical dessert cups by layering fudgy brownie or cake bases with buttercream “flower” frosting, creating a dessert that looks like an edible bouquet.
My Favorite Buttercream Frosting
This Buttercream Frosting recipe is excellent for cakes, cupcakes, and more. Its unique flavor is just the best.
Ingredients
- 1 cup nonsalted butter (do not warm)
- 4 cups powdered sugar
- 1 tsp vanilla
- 4-6 TBL coconut milk (I like The Kitchen Organic)
Instructions
- Cream the butter until soft in a mixer for about two minutes.
- Add the sugar, vanilla, and three tablespoons of coconut milk.
- Add the remaining tablespoons of coconut milk as needed.
- When frosting cupcakes, make sure the cake is completely cooled. You can place them in the freezer for about thirty minutes before decorating.
The post walks through the simple steps to assemble the cups, from base to frosting to flower design, and shares why these tea-cup treats are perfect for baby showers, garden parties, or any gathering where you want dessert and décor to double as art.

The Cutest Floral Dessert Tea Cups


If you enjoy my blog, you can sign up to receive my updates here.
.
Latest Posts
- The Best Spring Pillow DIY – A Handmade Spring

- DIY Clay and Metallic Foil Easter Eggs
- The Amazon Big Spring Sale is Here!


You can pin the image below to your boards on Pinterest (click the Pin button in the top left corner) or follow me on Pinterest!
For more real-time updates, follow me on Instagram @My100YearOldHome

