My Favorite Recipe for Berry Pie
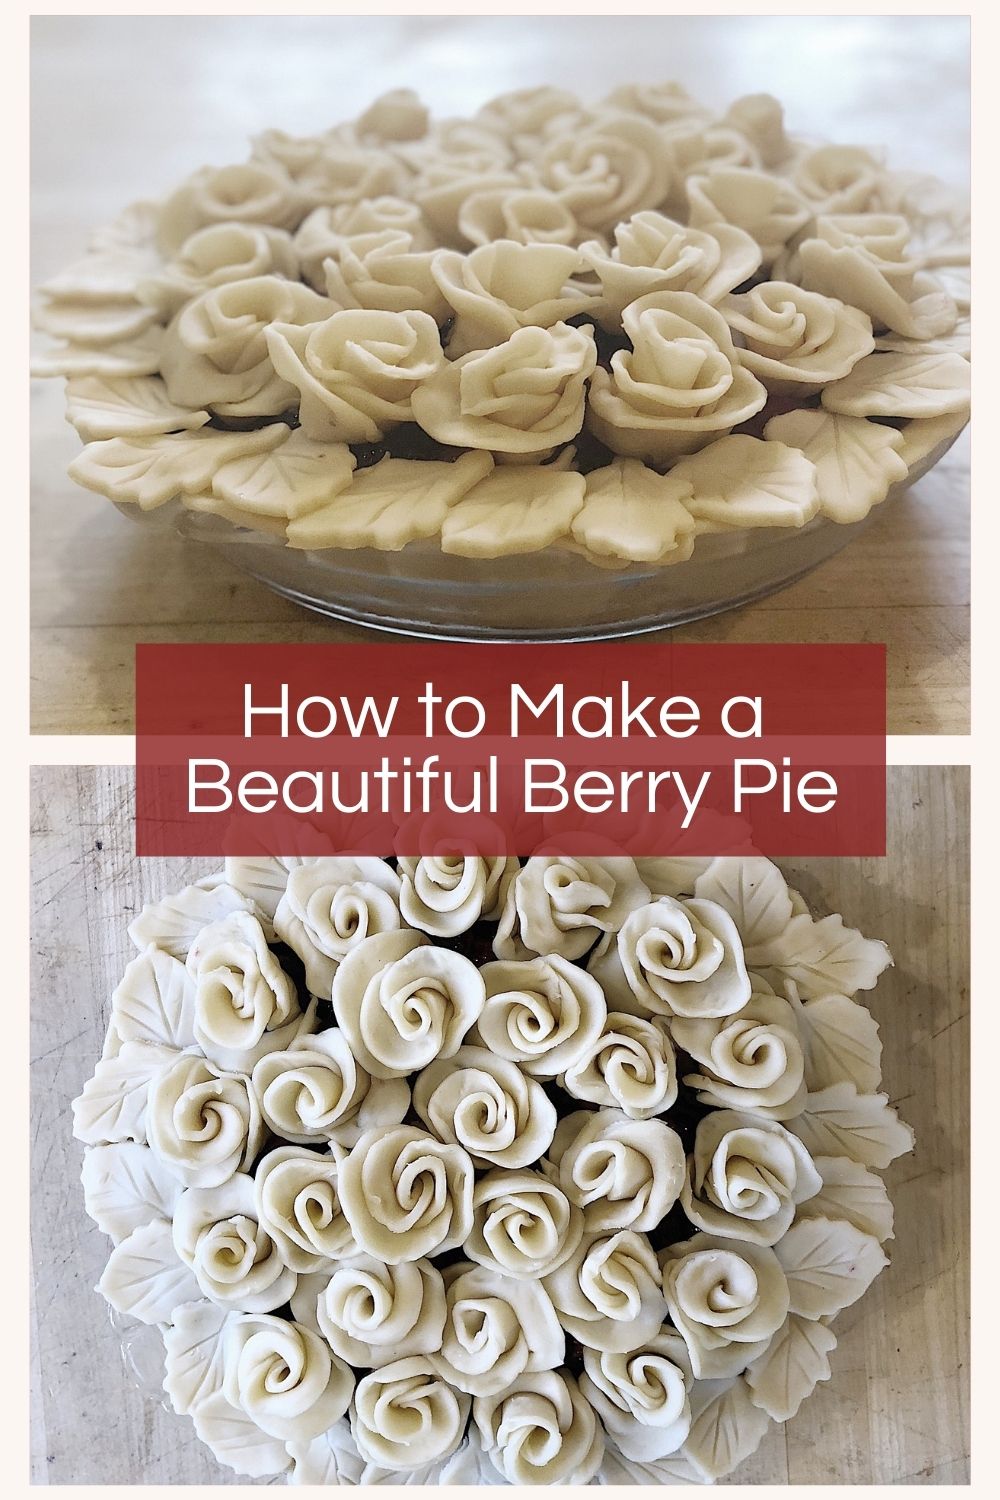
Today I am sharing my favorite recipe for Berry Pie. I feel very strongly that if you are going to make a pie, why not make it beautiful?
I can’t wait to share how to make this wonderful berry pie. It is so fun to make and one of those desserts that everyone can’t believe you made! Isn’t it amazing?
Berry Pie Recipe
In the spirit of Living Beautifully (my theme for the month of February), why not make a beautiful berry pie?
I love to bake. Of course, I love making Apple Pie. And any dessert that has berries is my favorite. Many of you have already tried my Berry Cobbler Recipe.
I decided it might be fun to make a mixed berry pie and I came up with one of my favorite recipes for berry pie.
I didn’t have a recipe for berry pie so I took my berry cobbler recipe and just made some adjustments. It is probably one of the best-tasting and prettiest pies I have ever made.
It’s perfect for any time of the year too. Especially Valentine’s Day.
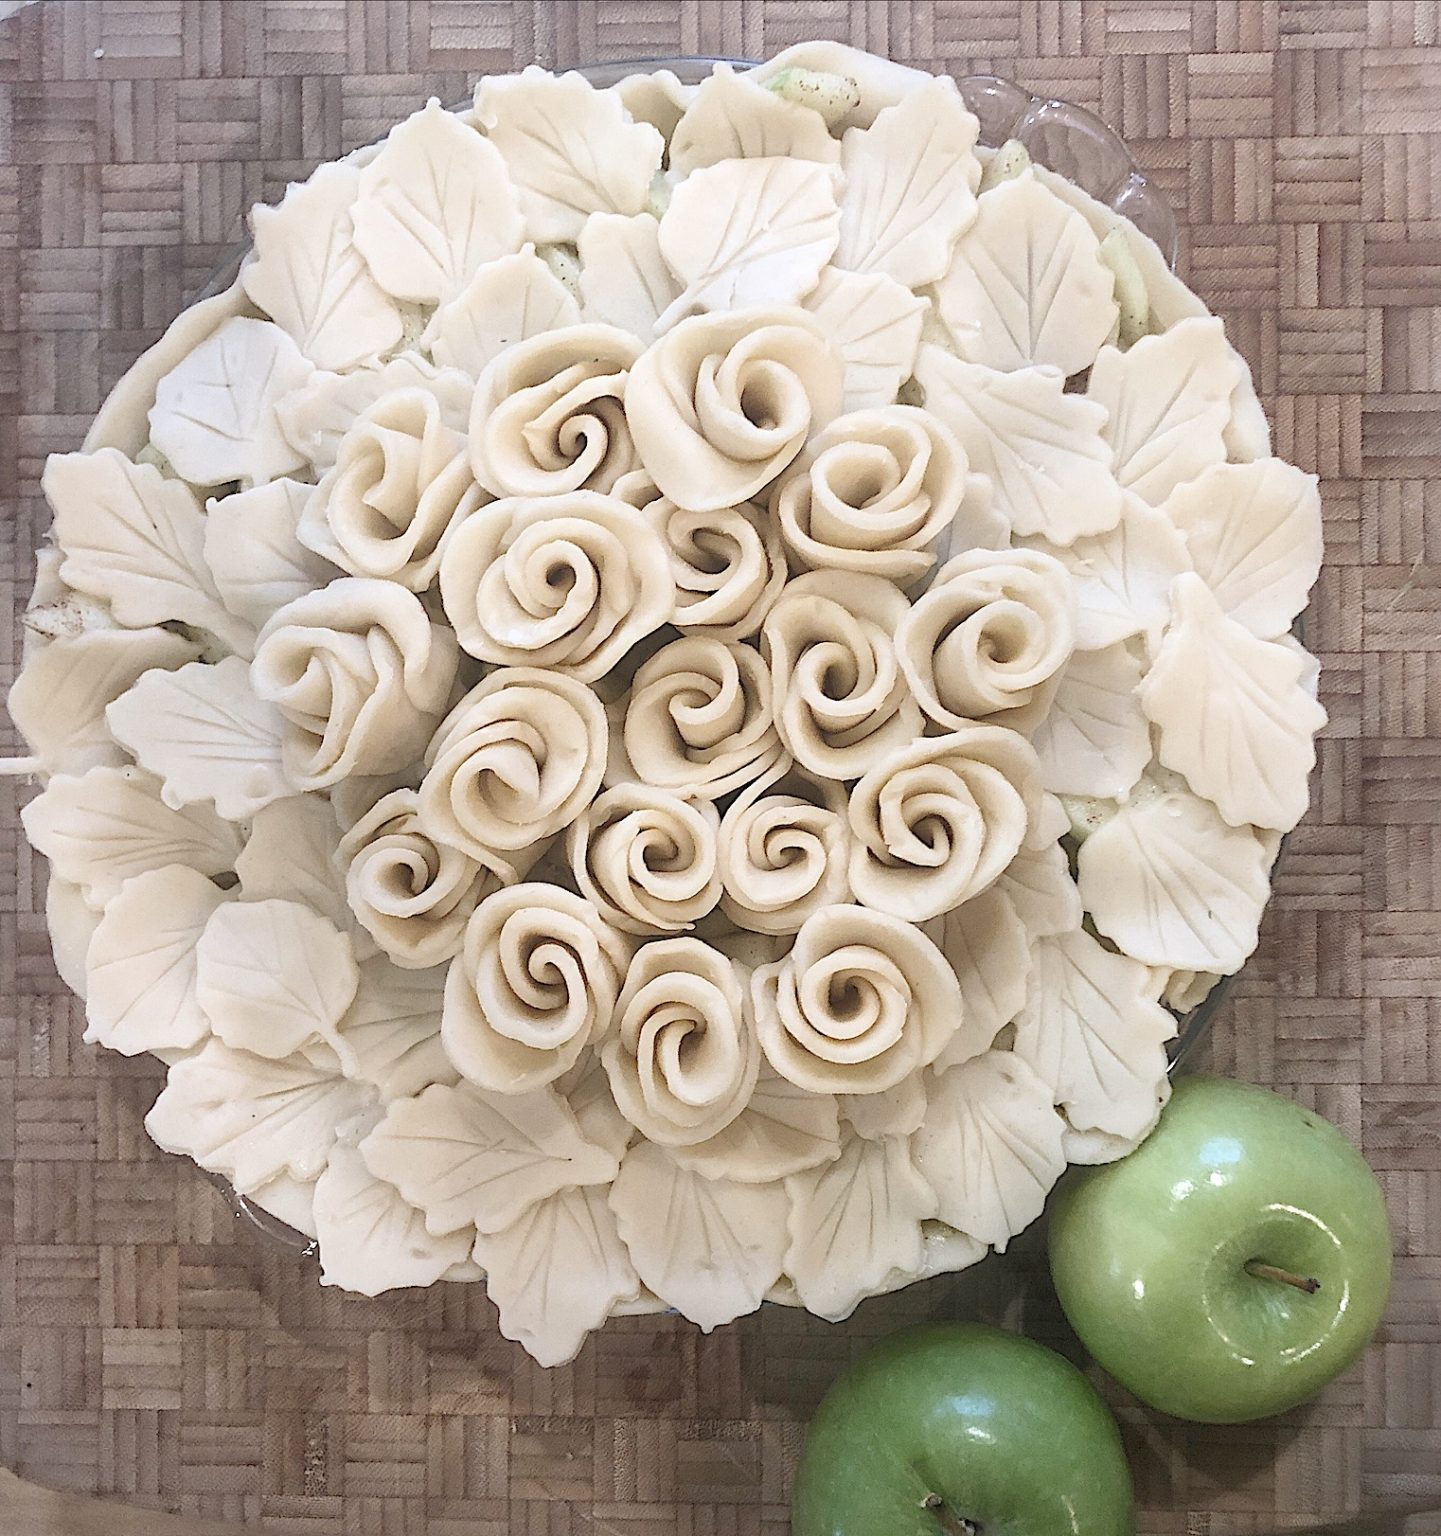
I knew I wanted to make a fun crust so I went to Pinterest and found this lovely rosette and leaves pie crust on a site called The Kitchen McCabe. It was fairly easy to make but did take more time than I expected.
How to Make a Beautiful Berry Pie
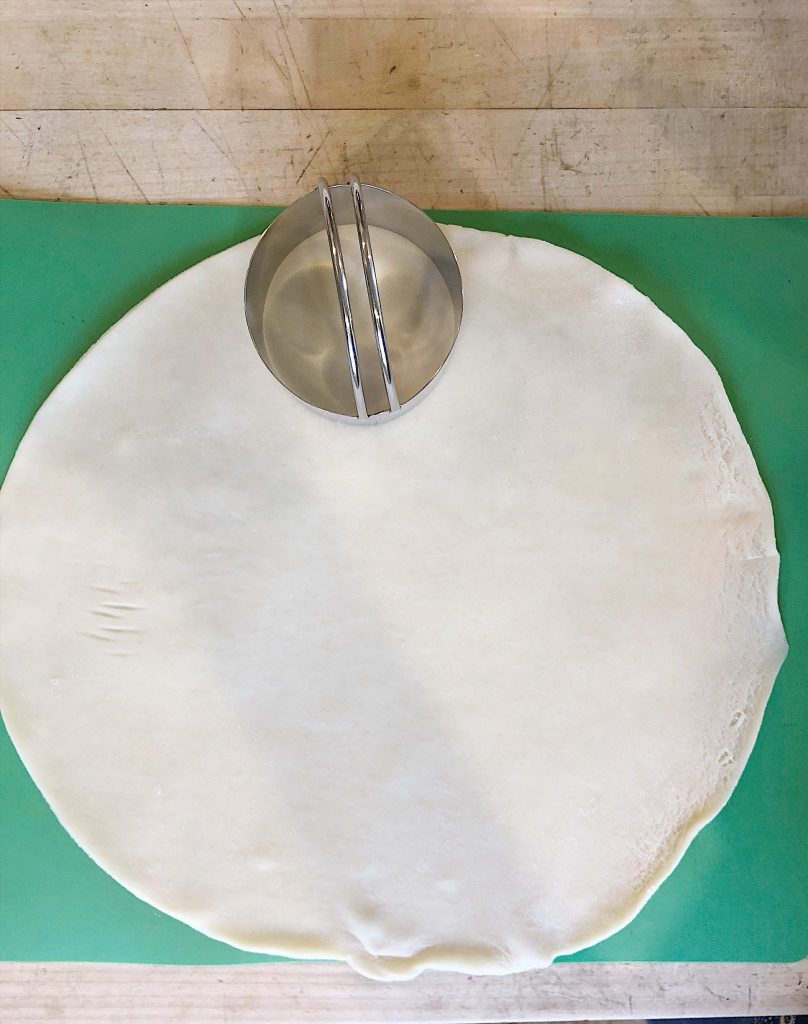
To start, use a 2″ round cutter and cut circles using four pie crusts. (The fifth pie crust is for the leaves for the pie and the sixth pie crust is for the bottom of the pie.)
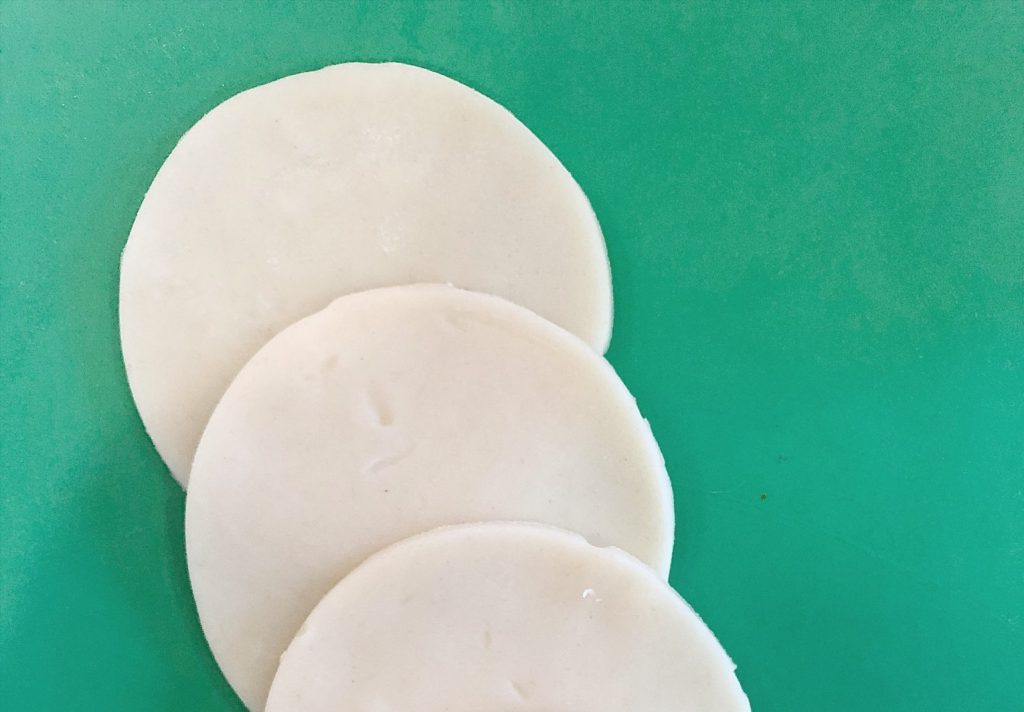
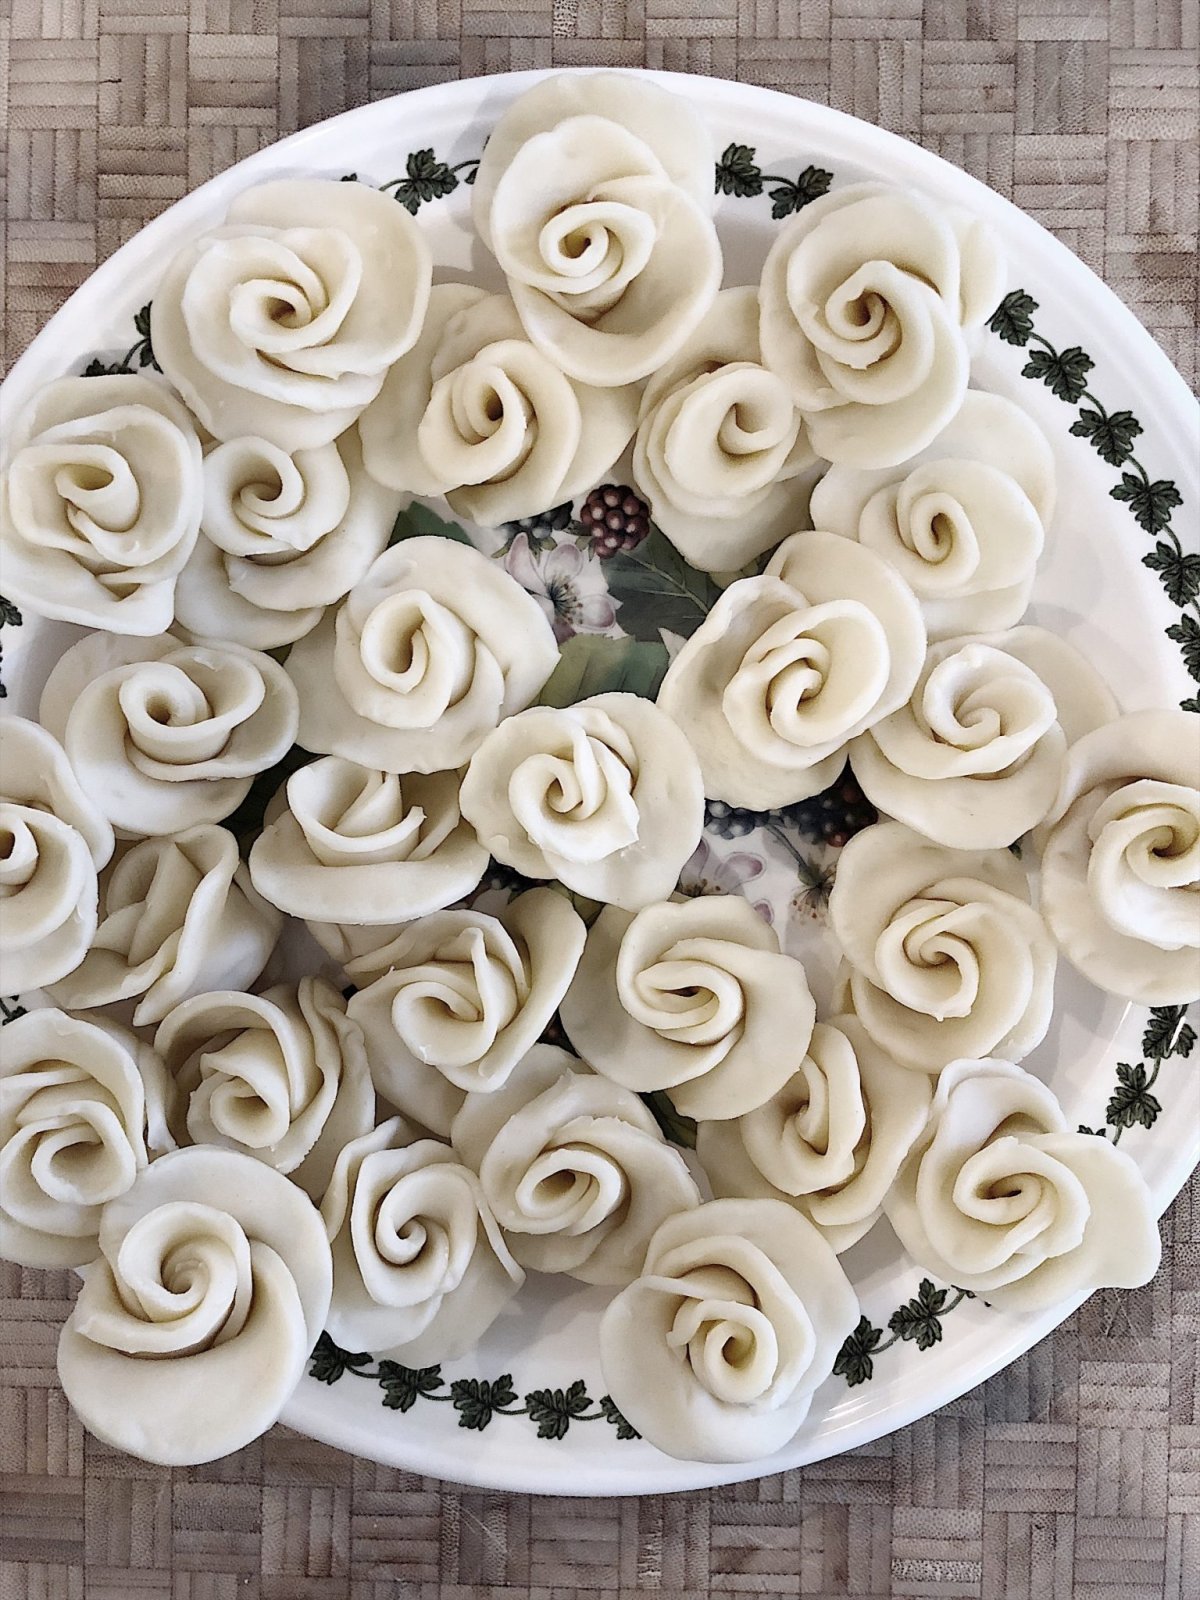
To make the flowers, place three of the circles, as pictured below.
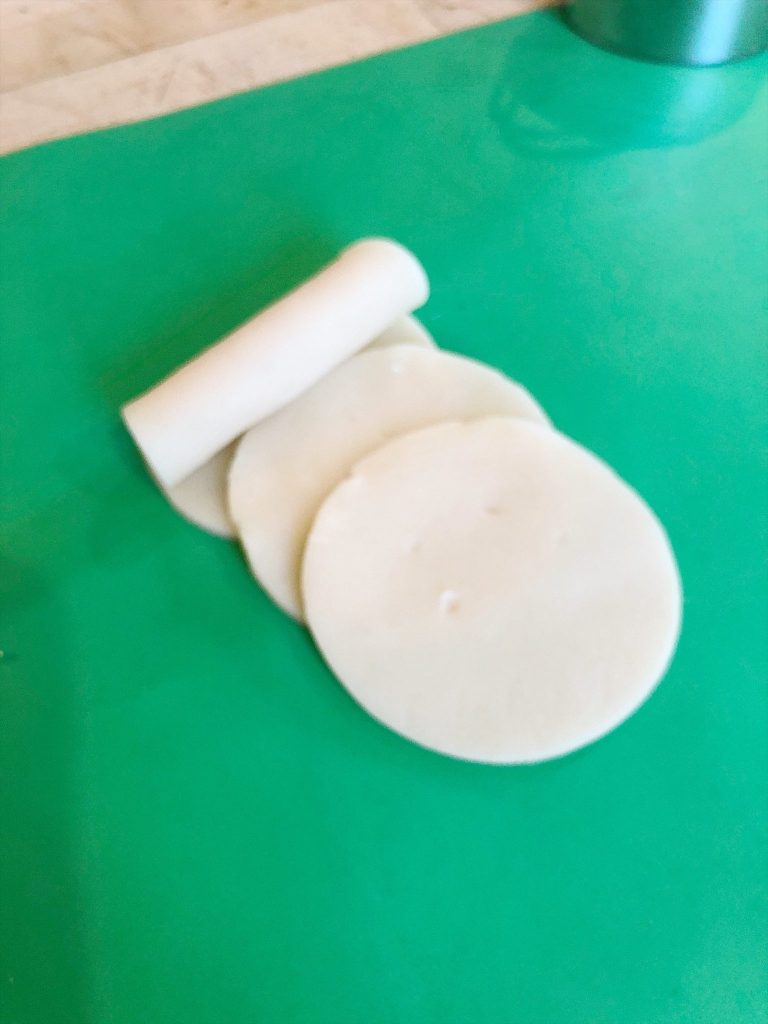
Gently roll up the three circles.
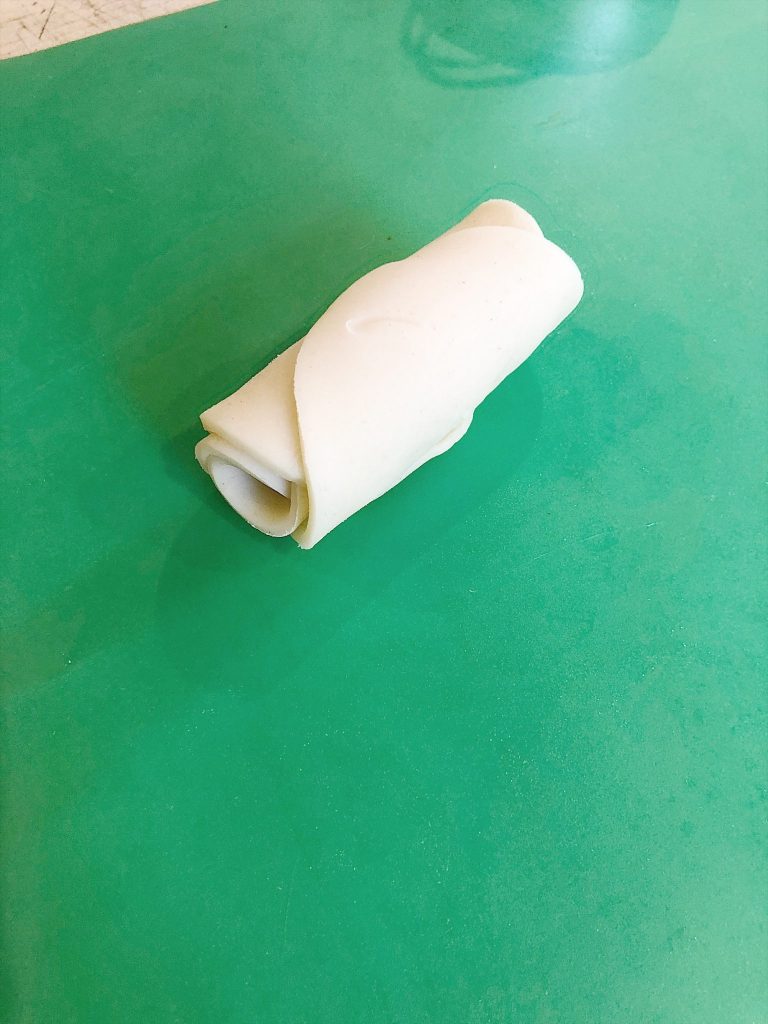
It should look like this when you are done rolling the pieces of dough.
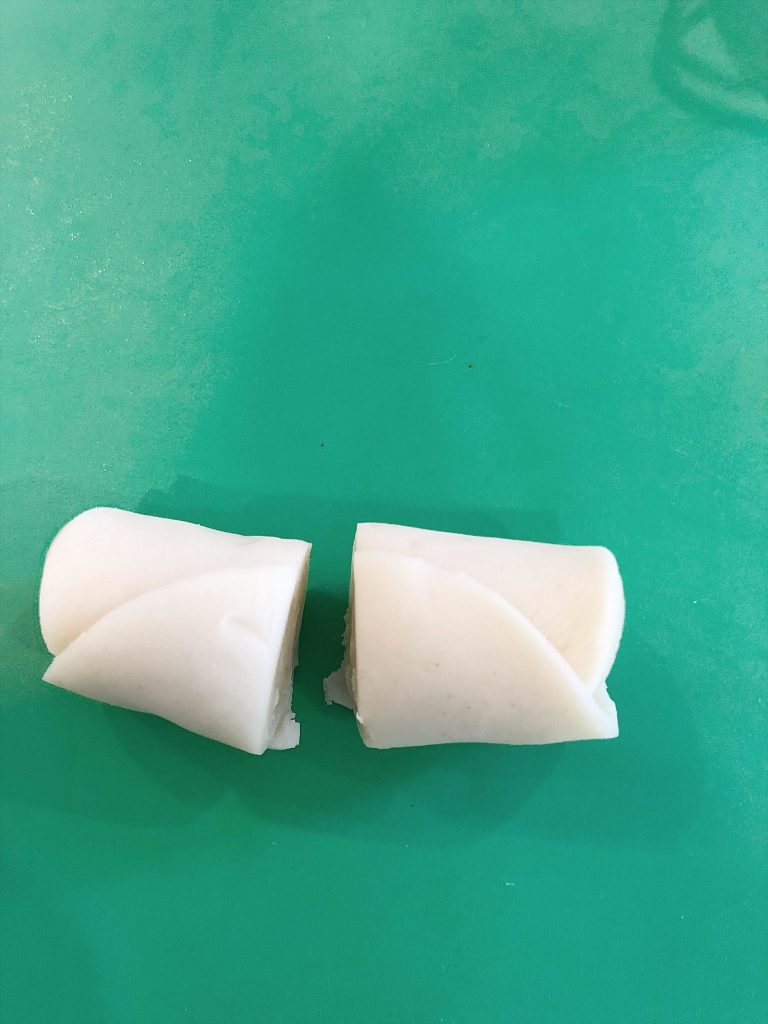
Slice the rolled pie crust circles in half.
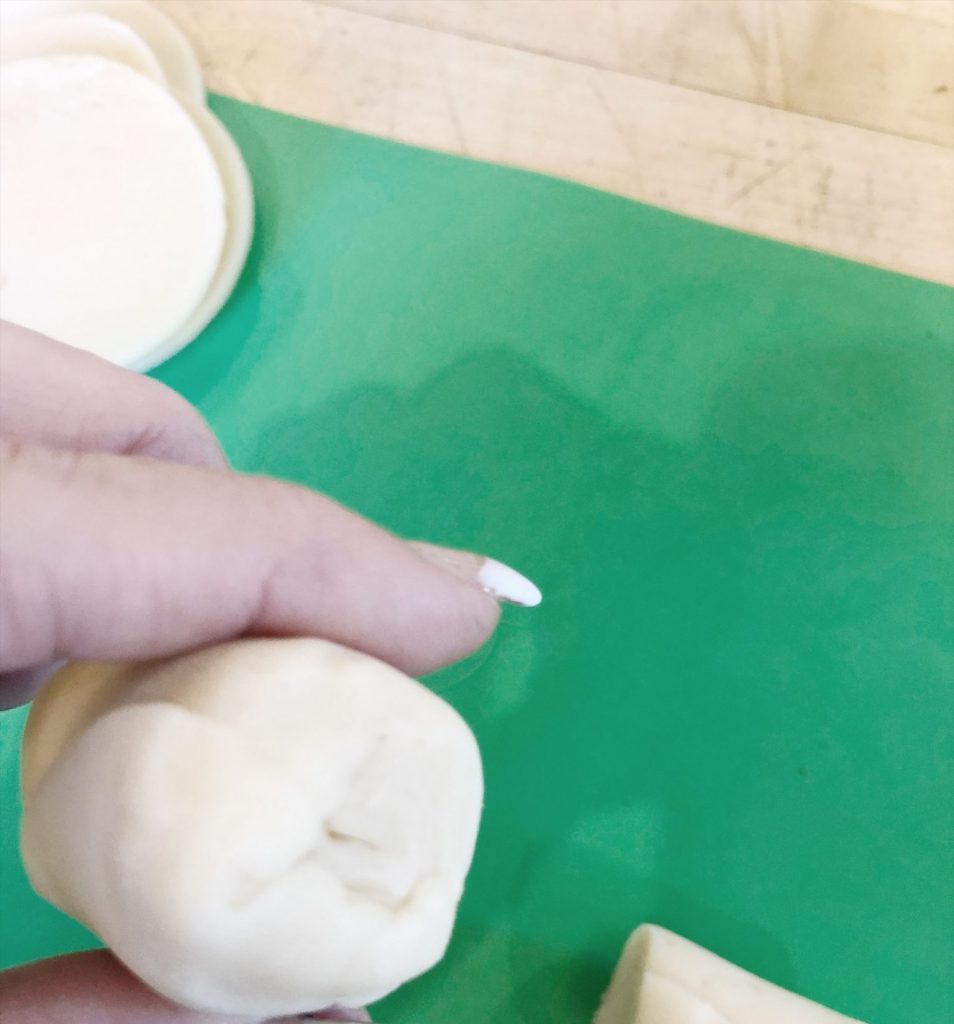
Using your fingers, pinch the non-fluted end together.
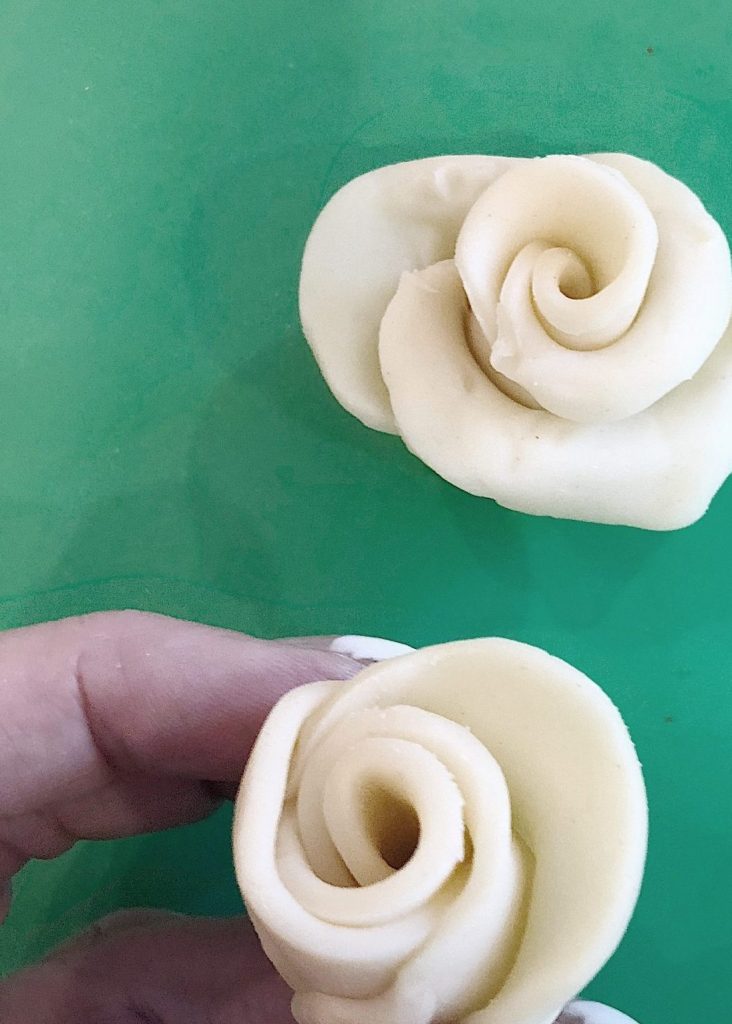
Flip over and gently pull apart the petals to resemble a rose.
Set the petals aside on a plate as they are made.
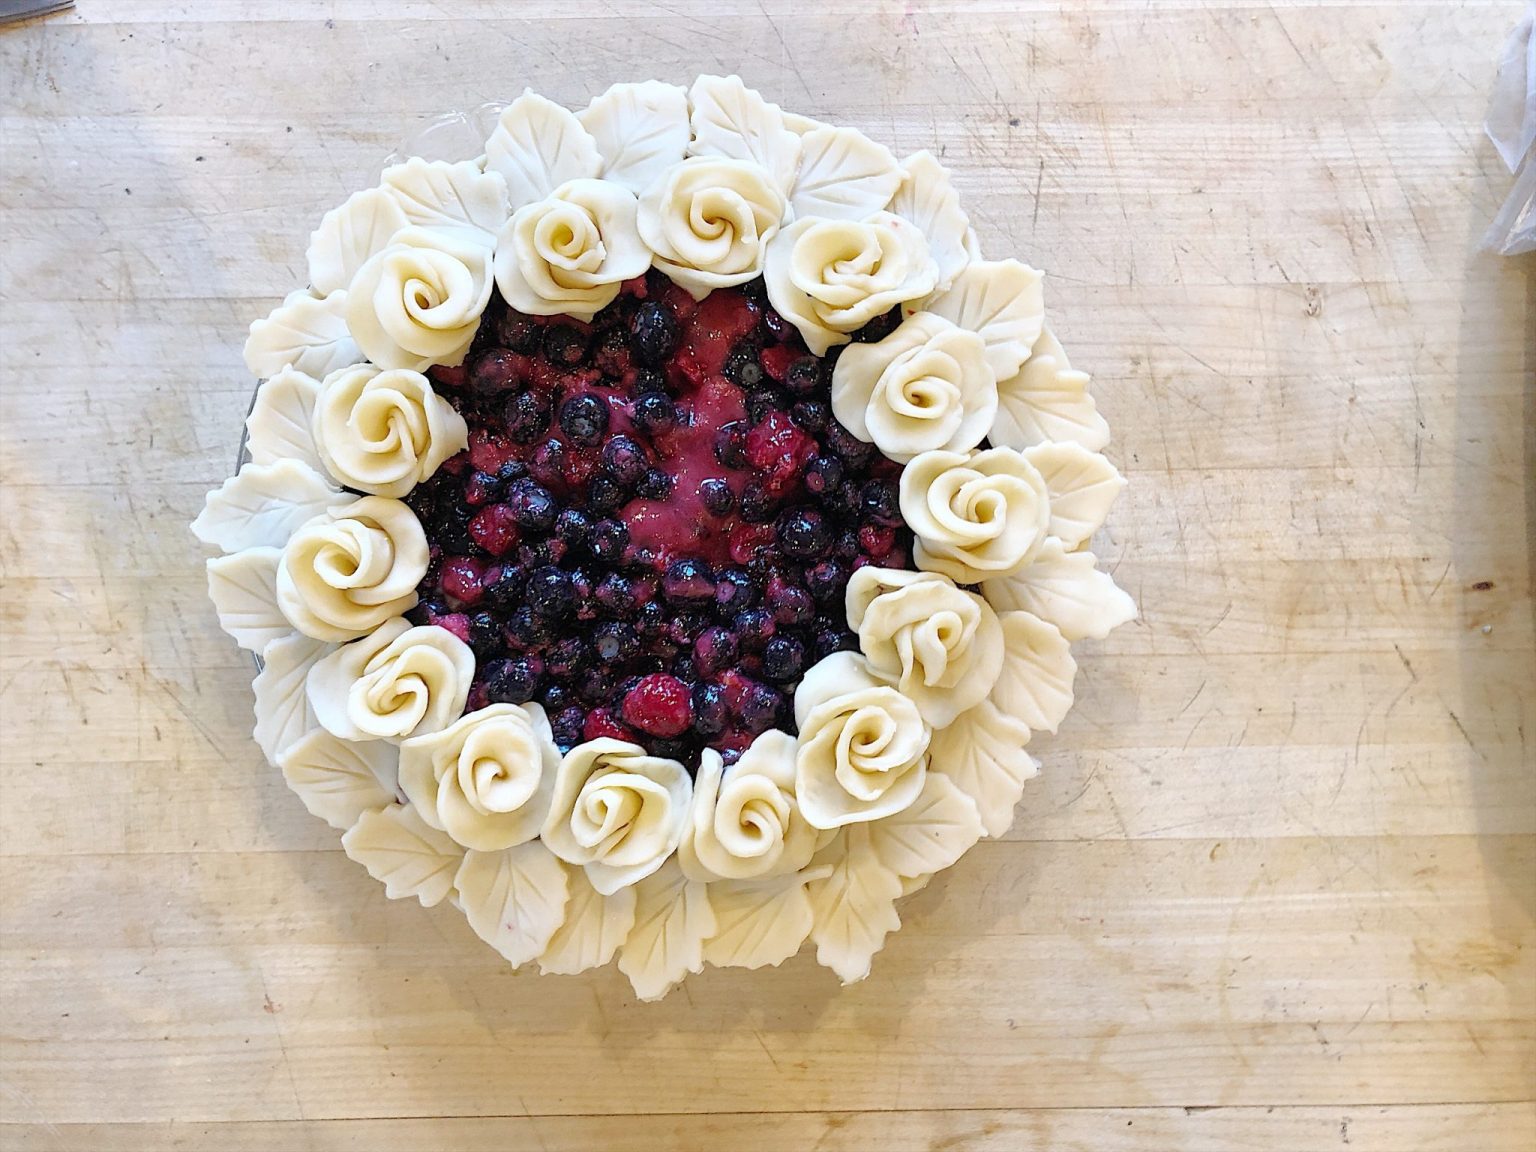
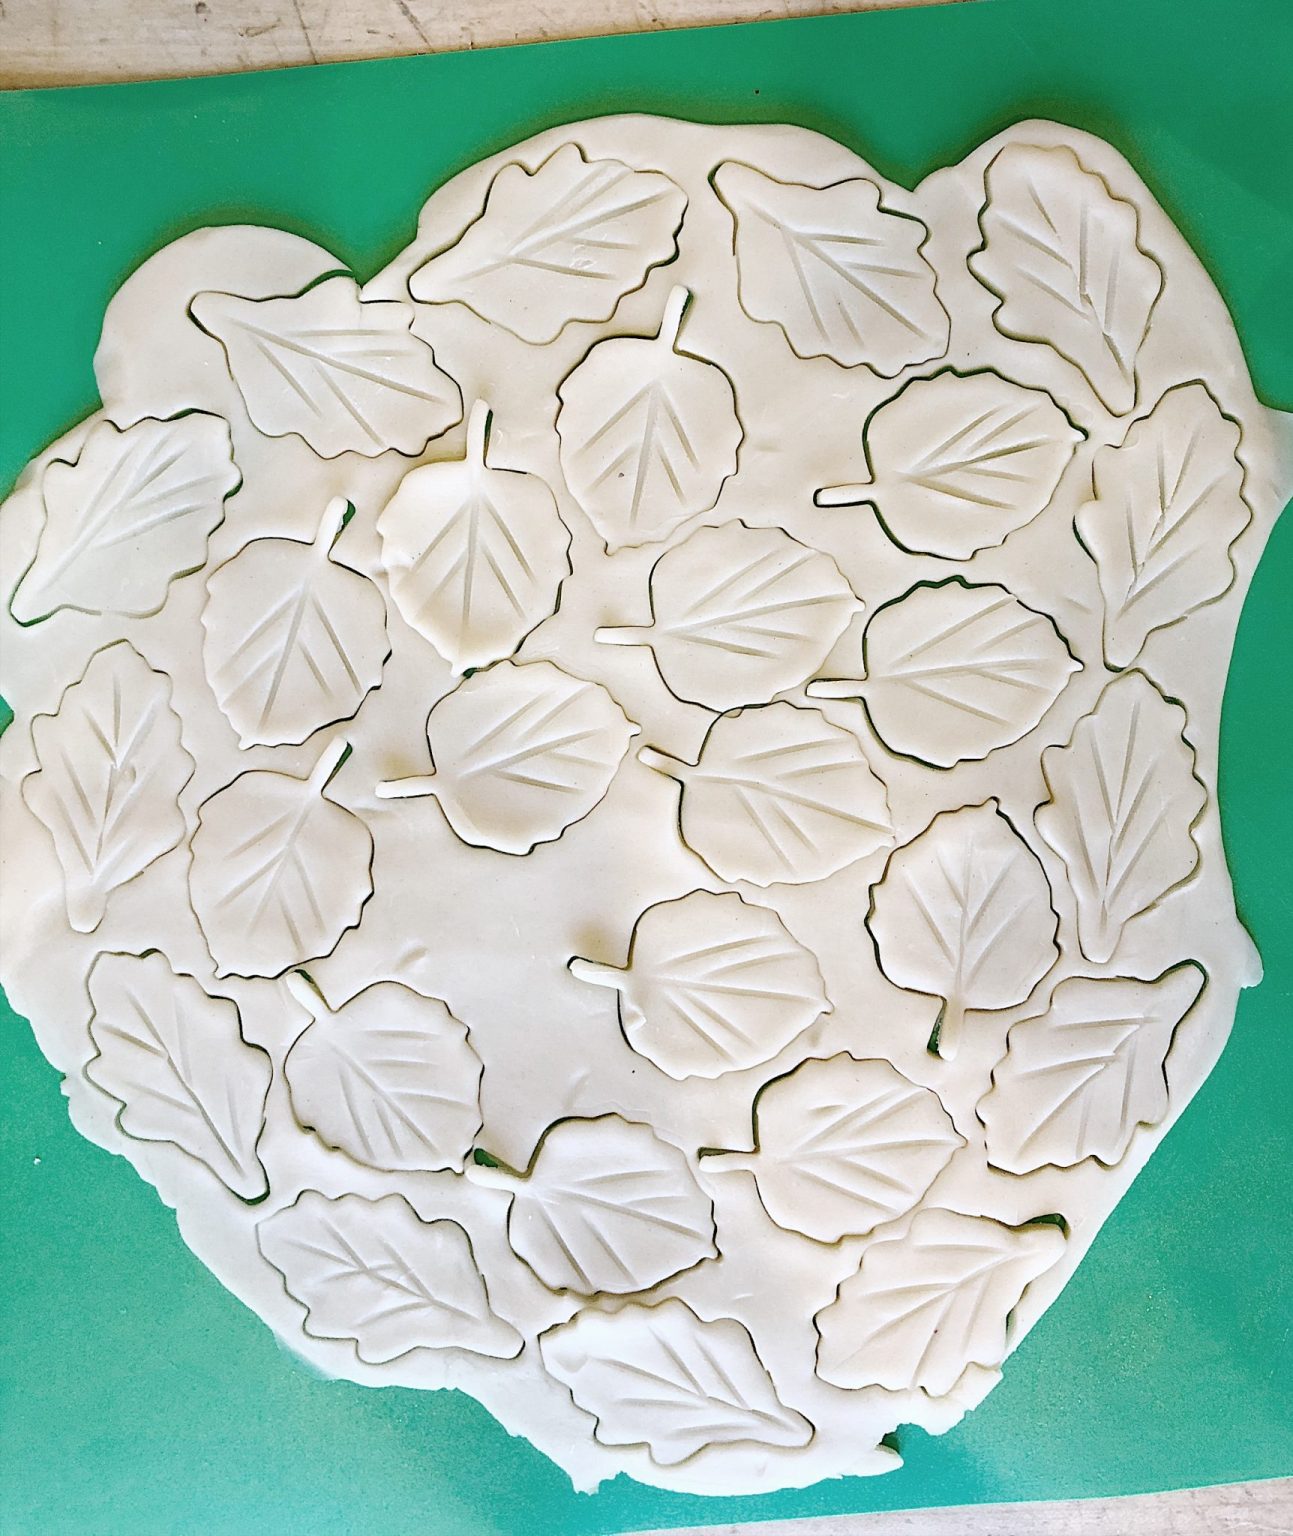
Using a leaf cookie cutter, cut one full pie crust with leaves. Use a knife to add the leaf lines.
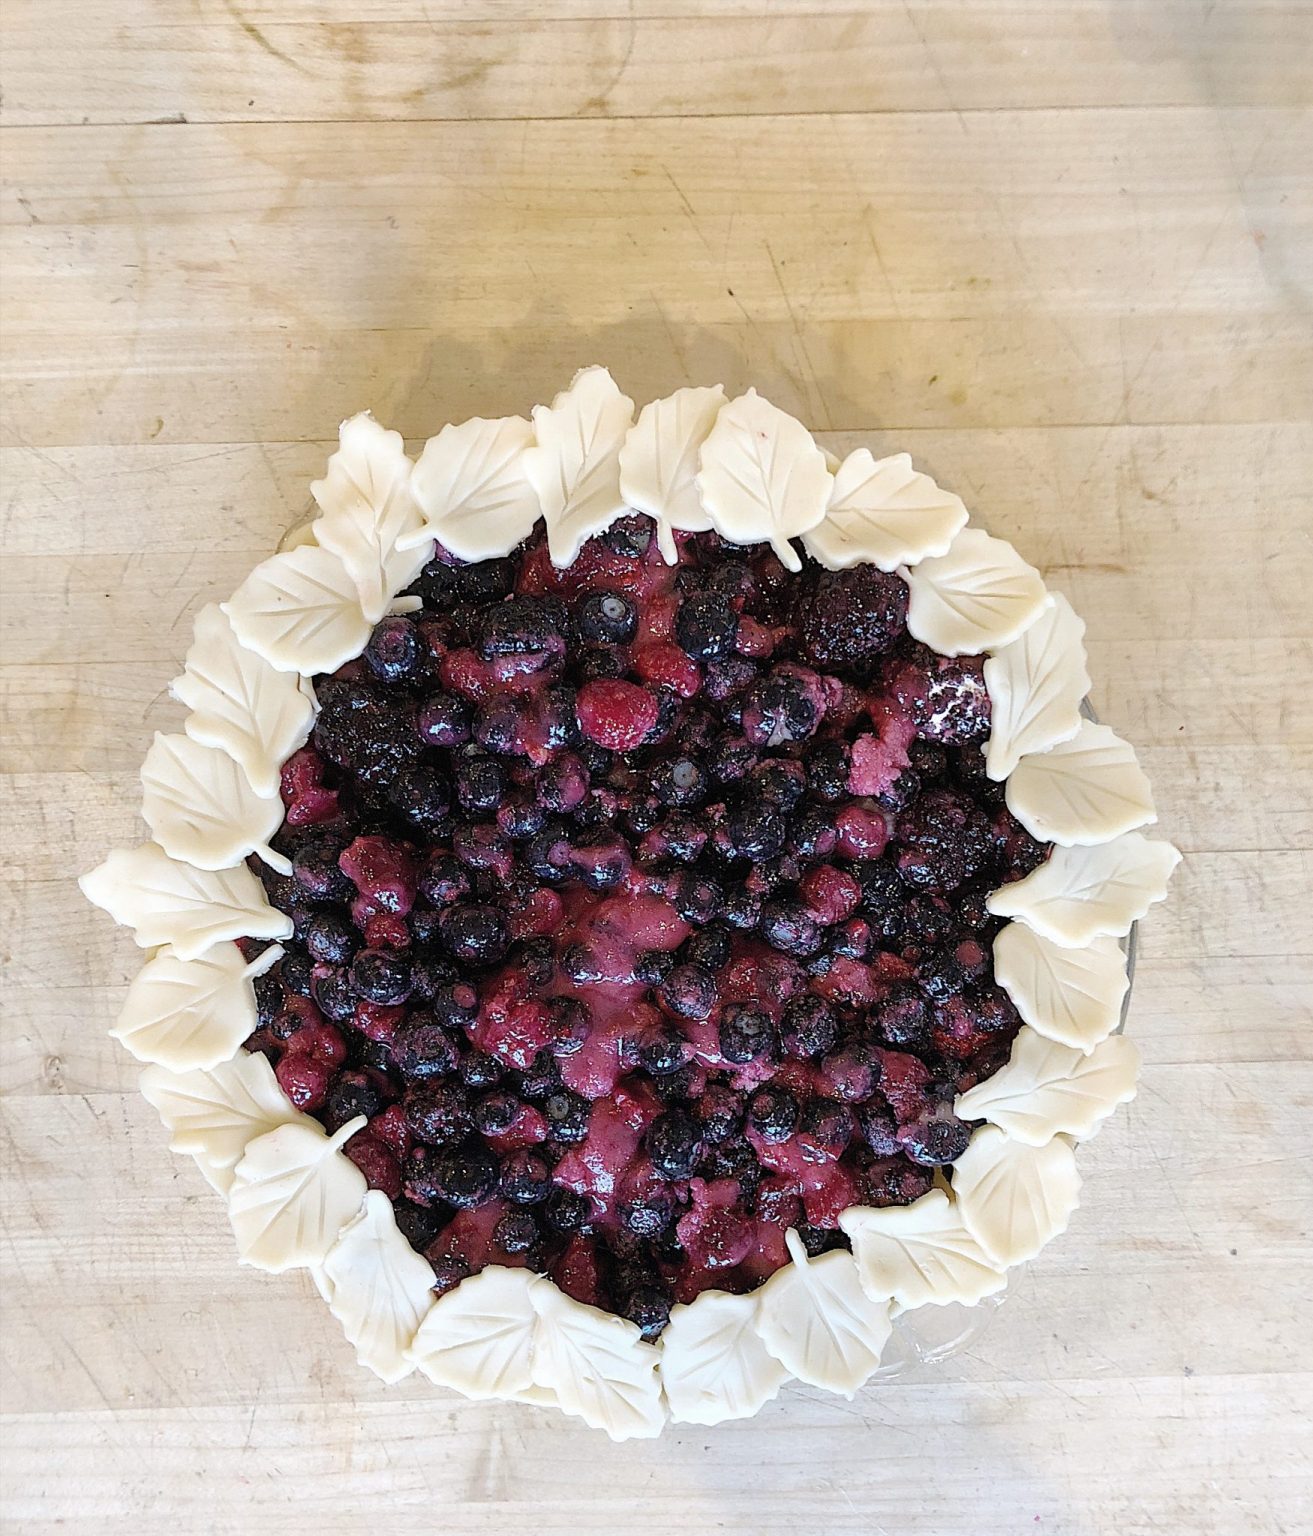
Place the leaves all along the outside of the pie crust.
I cut about 1/3 of the bottom of the rose off with scissors (or a knife) so that the crust from the roses isn’t too thick. But you can certainly leave them as they are.
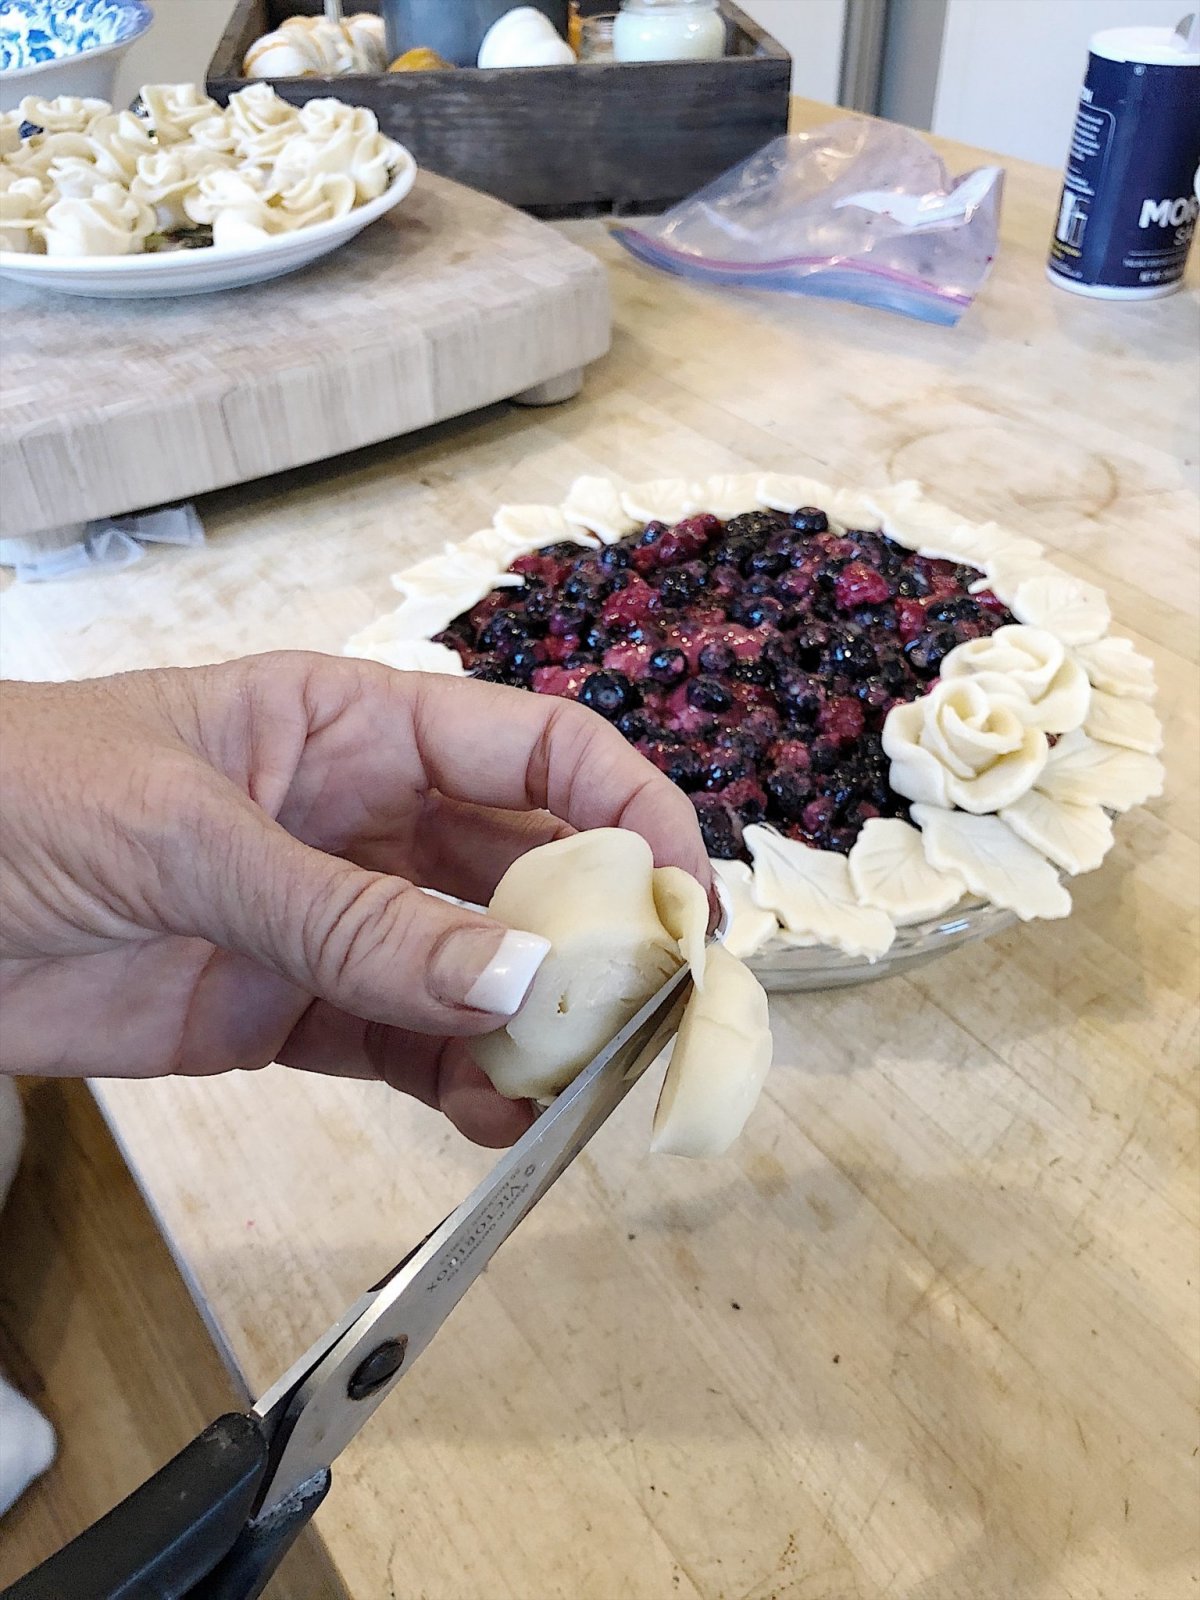
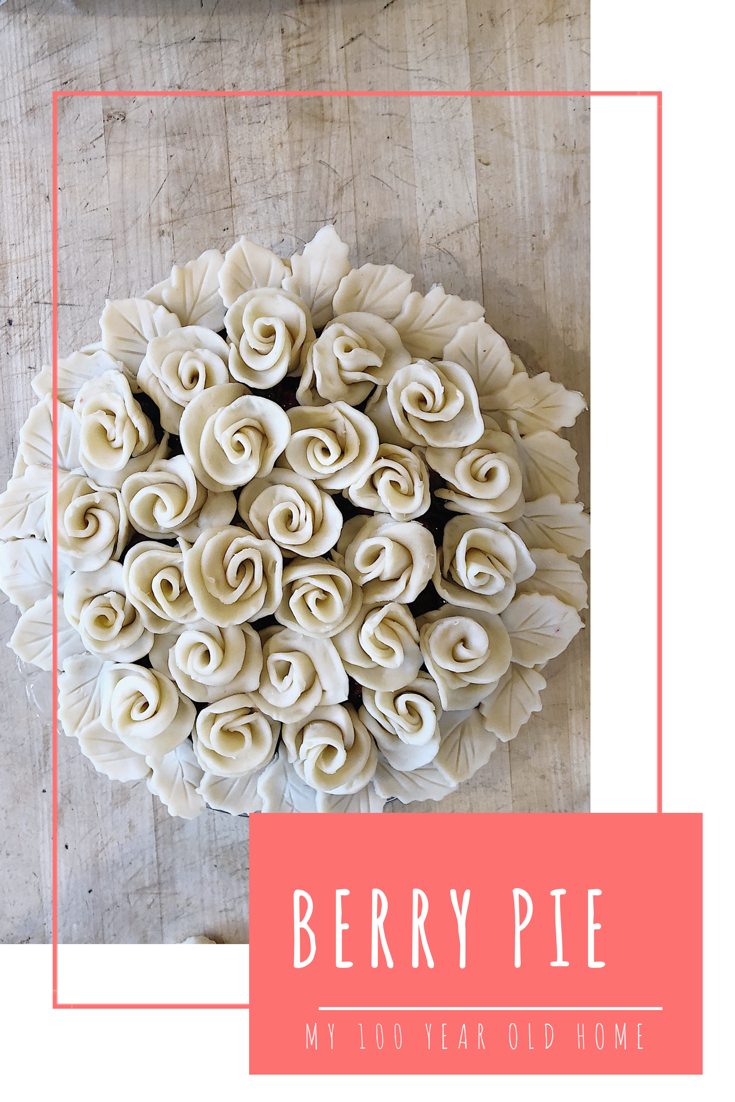
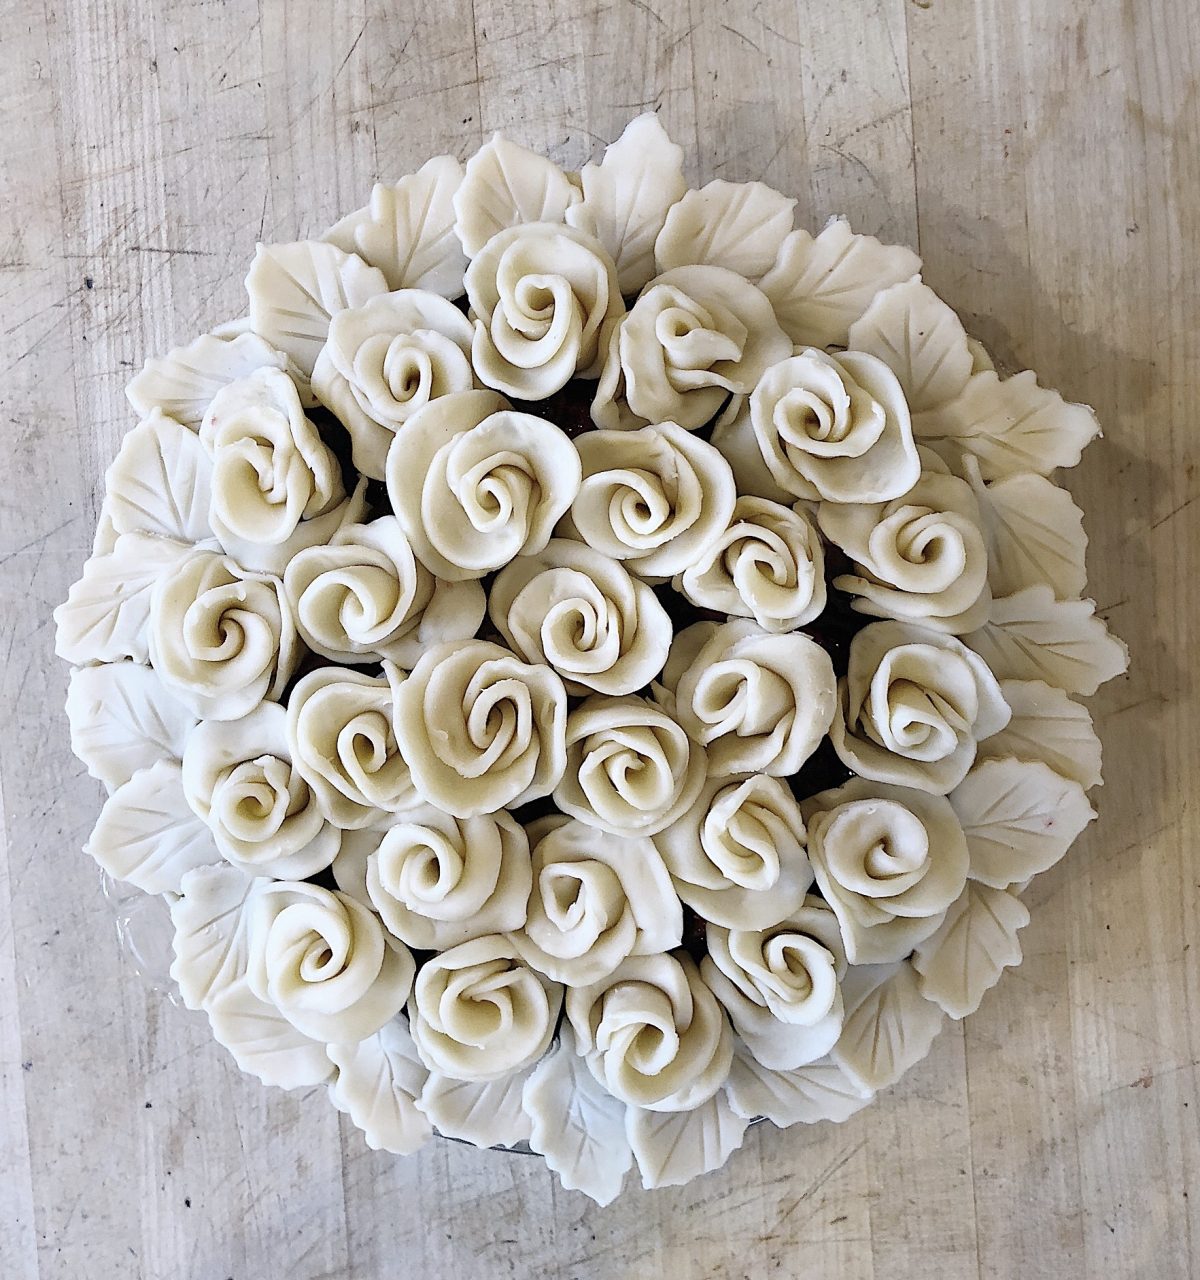
Place the roses in a circular motion on top of the pie.
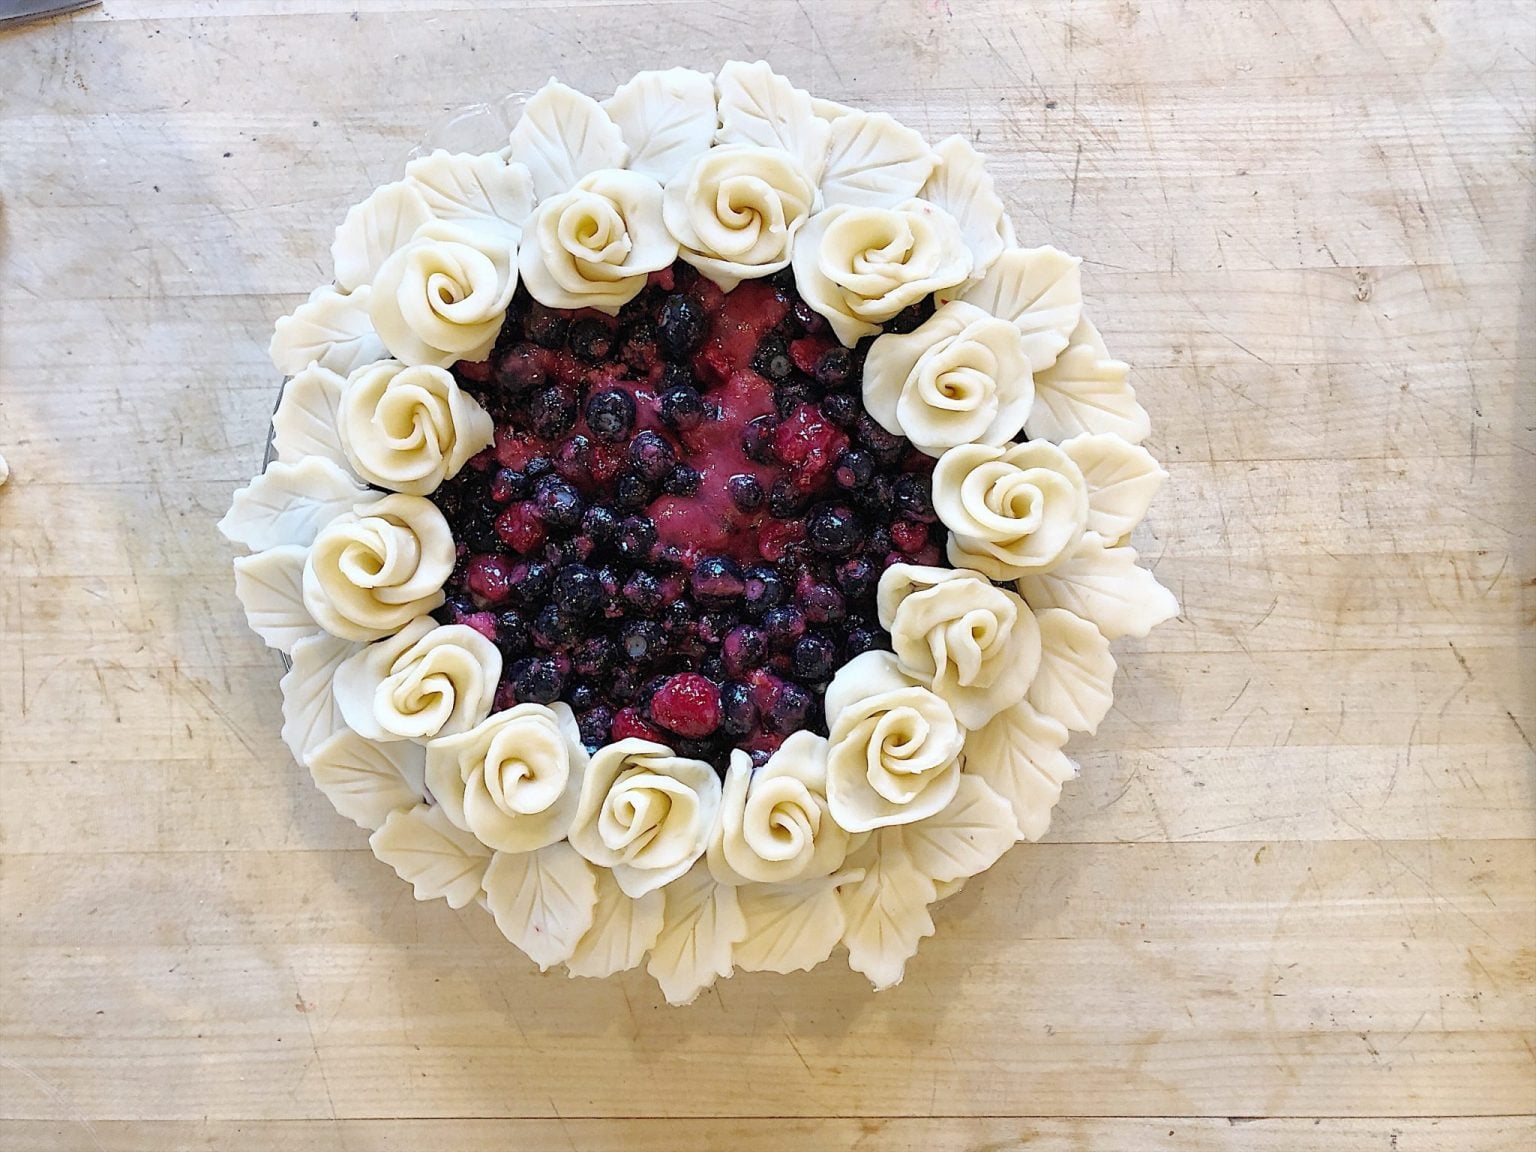
Continue to add another circular row of flowers.

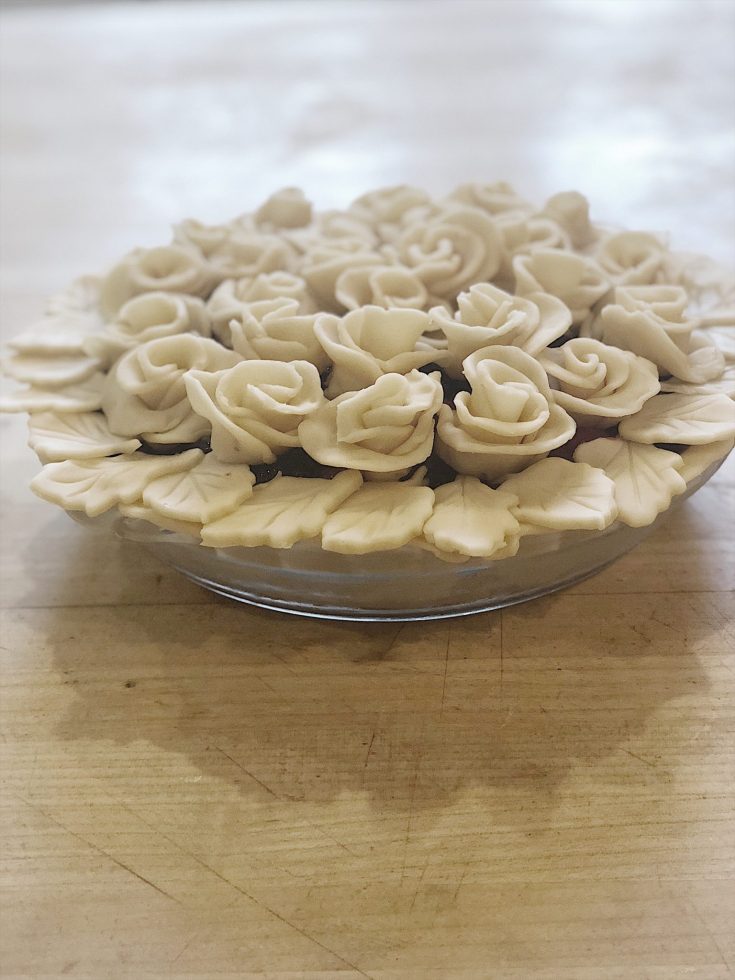
Finish off the pie with the last few flowers.

Doesn’t this look amazing?
My Favorite Berry Pie
This berry pie is one of the most delicious and prettiest pies you will ever make. The crust recipe is courtesy of Chef Monique Chan.
Ingredients
- Ingredients
- ** This recipe is to make one two-crust berry pie. If you want to make the rosettes on top of the pie, triple the crust recipe.
- Crust:
- 3 1/8 cup flour
- 1 1/2 tablespoons sugar
- 1 teaspoon salt
- 1 1/4 cups butter
- 1 cup of ice water
- Berry Pie:
- 2 cups frozen blueberries
- 2 cups frozen raspberries
- 1 cup frozen blackberries
- 2 cups sugar
- 1/2 cup cornstarch
- 1 tsp salt
- 1 egg white, whisked
Instructions
To make the crust:
- Stir flour, sugar, and salt together until well mixed.
- Dice butter into small cubes, and toss in flour mixture. Break up butter chunks until they are slightly larger than the size of peas.
- Add 1/2 cup of ice water and mix. Then, add water in small increments, targeting any dry spots. Mix until dough can form shaggy clumps when squeezed together. You will most likely need up to 1/4 cup ice water more, but add it one tablespoon at a time.
- Divide dough in half, and form each half into a disc. Wrap both discs in cling film, and refrigerate for at least one hour before using. Overnight is preferable, to hydrate the flour and relax the gluten. (If keeping the dough in the fridge for longer than a day, or freezing it for storage, use a second layer of plastic wrap.) Dough will keep up to 1 week in the refrigerator, and up to 2 months in the freezer.
- When ready to use, roll the dough out to a 14 inch (diameter) round. Flour dough and table surface as necessary, and work quickly to keep dough cold. Rotate dough while rolling to maintain circle shape, and prevent dough from sticking to the table.
- For the remaining dough, make the rosettes and leaves as instructed in the blog post or on the video.
To make the pie:
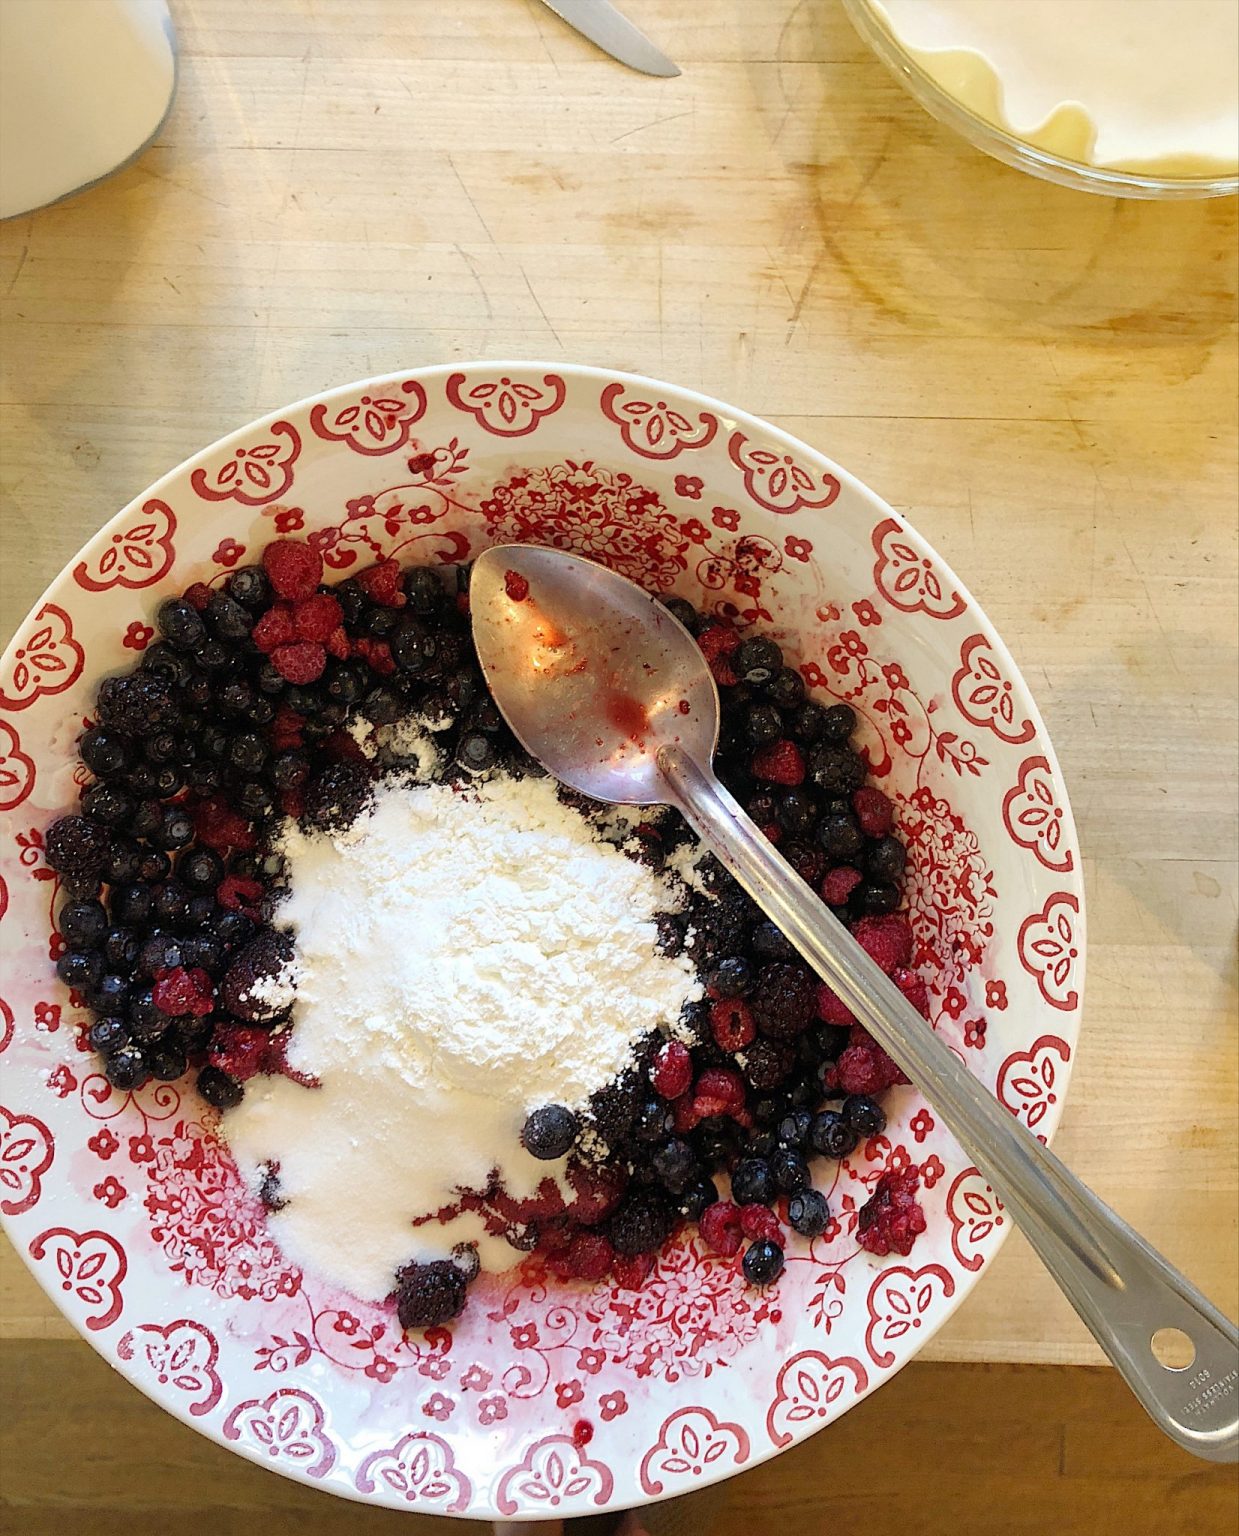
- Mix the frozen berries with the sugar, cornstarch, and salt.
- Add berries to the crust and complete the pie.
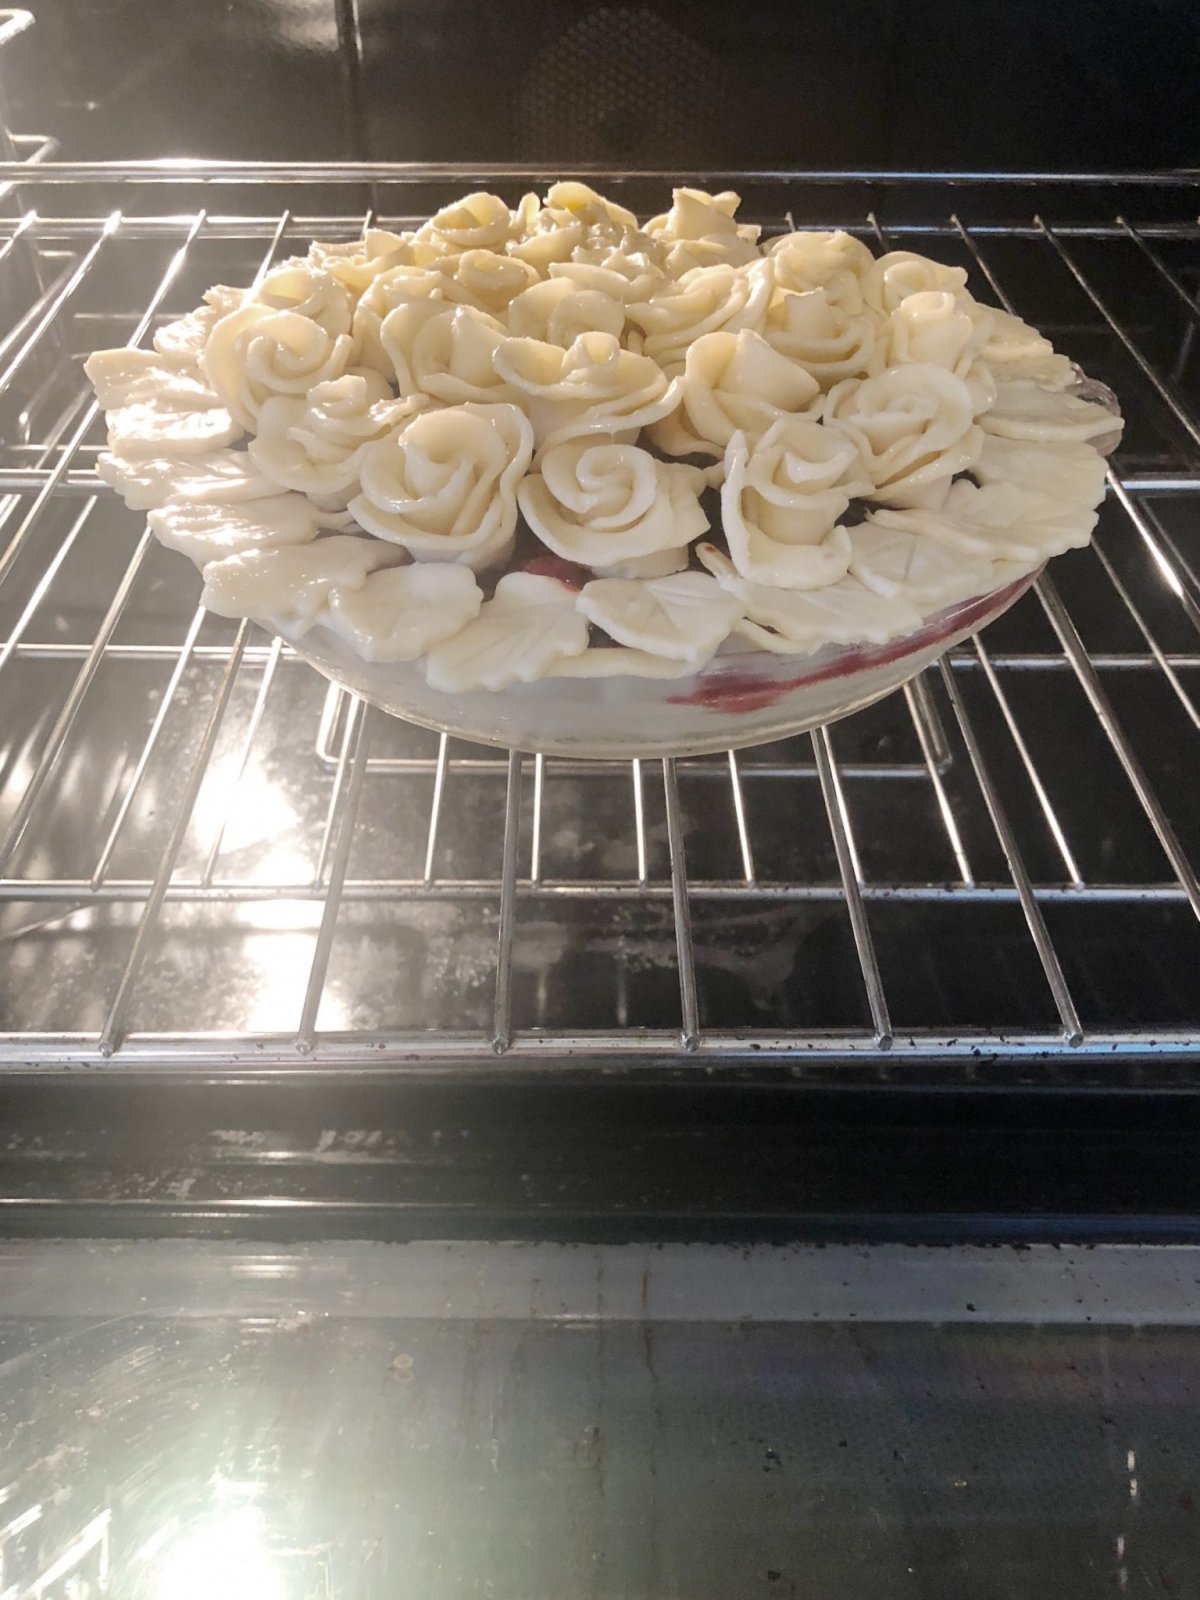
- Whisk egg white and brush on top of the crust.
- Spray a piece of foil with cooking spray and gently place (oil side down) on top of the crust.
- Bake at 375 degrees for 35 minutes. Remove foil and continue to cook for 15 more minutes.
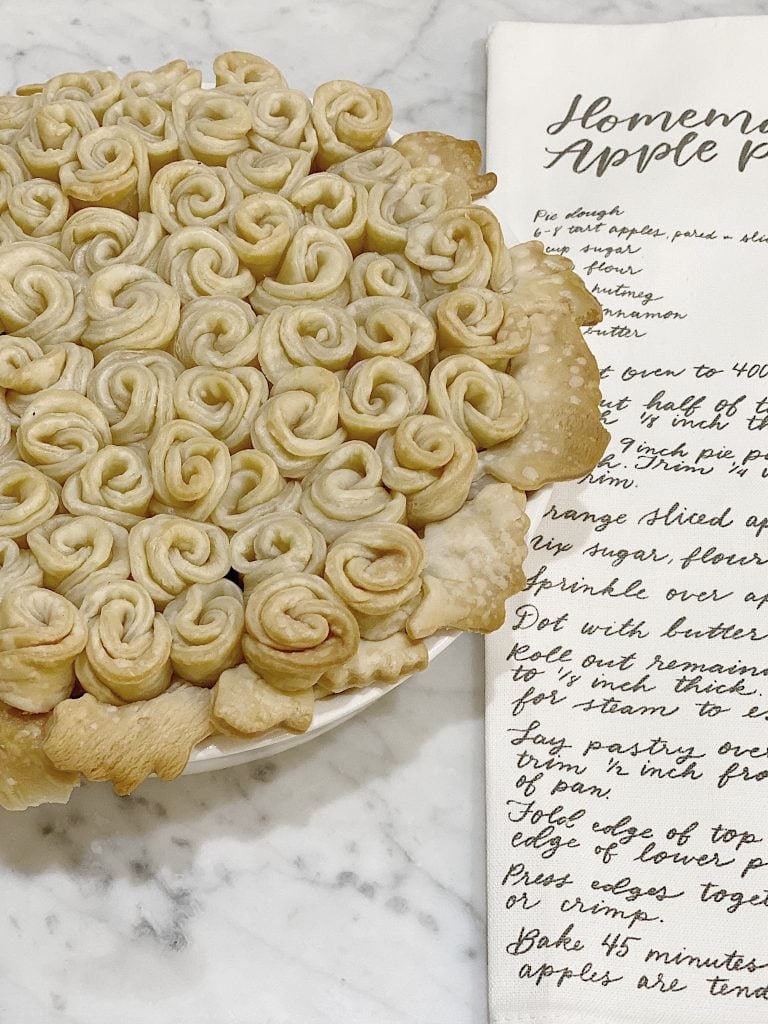
Here is how the pie looks once it is cooked. It is gorgeous.

More Pies with Rosettes

Watch My Amazon Live
I love having the chance to talk with all of you about all of the things that I love.
I am now sharing a few Amazon Live broadcasts every week and I hope you will tap on the links to see what’s new.


On this broadcast, I shared some of my favorite faux flowers and showed how to arrange them as well! Click here.

Are you looking to get in shape for the New Year? Here are some great items to help you get started. Click here.
Do you want to make your home cozier for the winter? Here are some wonderful items to do just that! Click here.
I love having the chance to talk with all of you about all of the things that I love.
This pie is both beautiful and yummy! Below are all of the materials you need to make it!


Pin the image below to your Recipe or Dessert boards on Pinterest (just click the Pin button in the top left corner). You can also follow along with me on Pinterest!

For more real-time updates, follow me on Instagram @My100YearOldHome


Omg..I LOVE that gorgeous pie!!!!!!!
I am amazed!! I would love to try this. I really enjoy your blog. I look forward to reading it and seeing your amazing techniques and ideas! Before I retired my coworkers called me Martha Stewart! I love her stuff too. You are so talented!! I am hoping to learn a lot from you. Your home is gorgeous!! So glad I subscribed to your blog. I am smitten!!!
Thank you so much G for reaching out and for your kind comments. I am so glad you subscribed also, that way you don’t miss anything! I have so much planned for this year, it’s going to be so much fun!
Happy Valentine’s Day!
You are some amazing woman! You post every day with beautiful crafts, recipes, etc. which I enjoy so much.
I’m reading the Alzheimer’s book you recommended so trying to eat healthy lol. Trying to watch sugar so I’m wondering if the filling recipe for sugar cd be cut in half and use something else for the other half? Just asking lol.
Thanks for giving us a push every day to make gorgeous crafts and entertaining us!
Janet
Thank you for reaching out Janet. And yes, there are so many wonderful options for sugar substitution. I very much appreciate your thoughtful comments and support!
This is so gorgeous! I’m a pie maker too, but I’ve never made anything this pretty!!! Maybe today I will play in the kitchen and give this a try! 💛
Oh I hope you give this a try Michelle, especially since you are a pie maker! Let me know how yours turns out!
Spectacular! Thank you for sharing!
Thank you Debbie!
Omg, I all giddy that I found your site and joined it, each time I pull up one of your post. This pie is to pretty to cut into. You keep amazing me with you fabulous creativity. Thanks!
Oh my gosh Ivory, thank you so much. The best thing about this pretty pie is once you cut into it, just make another one! I am so happy that you enjoy what I share. I have so many amazing things planned for this year!
Too beautiful to eat.
It is so pretty, but, good news is that once you dig in, you can always make another!
Wow that is a beautiful pie
The best part about how beautiful this pie is, is that it is not that hard to make. So, dig in! And then make another one!
hi,
you have too much time on your hands, lol. looks amazing, but beyond my skill set, I think. you are definitely a ‘Martha Stewart’.
i agree, too pretty to eat, bet it’s as good as it looks, enjoy!
Wow! That is the prettiest pie that I have ever seen. Almost too pretty to eat. You are amazing!
Can you use pre-made crusts?
Also the recipe is got a straight two crust pie so with all the additional crust with the roses and leaves should it be baked any longer or differently?
This pie recipe is wonderful. Then you added the leaves and roses to made it extraordinary. It is one of the most beautiful pies I have ever seen and know coming from you it tastes as good as it looks.